Setting up your own VPN is not a task «for geeks». The whole process takes about half an hour and costs roughly as much as a cup of coffee per month. In return you get a channel that belongs to you alone: it isn't crowded with other people's traffic, it doesn't sell your browsing history, and it won't be shut down one day along with yet another popular service.
This guide walks through the entire path step by step: how to set up a VPN on a server from scratch, from buying a VPS to a working connection on your phone and computer. We built a VLESS + WebSocket over Cloudflare Tunnel setup — it takes more effort than the popular REALITY option, but it has one decisive advantage: it works where the alternatives fall apart, including mobile networks with active blocking. We'll explain why, and show the difference with real measurements.
Every command in this article was executed on a live server rather than copied from documentation: the outputs, the errors and the pitfalls are all real.
What you'll need
- A VPS outside your country — the cheapest plan will do, a VPN barely consumes any resources.
- A domain — any cheap one. It is required for the Cloudflare tunnel.
- A Cloudflare account — free, the Free plan covers everything we need.
- 30 minutes of your time. No sysadmin experience required: every command is ready to copy and paste.
Choosing a server
The hardware requirements are minimal — 1 CPU core, 1-2 GB of RAM, any disk. Other things matter more:
- Location. The closer the server is to you physically, the lower the latency. Neighbouring countries typically give 40-90 ms, while the US or Singapore will add 150-250 ms, and that is noticeable.
- Operating system. Go with Ubuntu 24.04 LTS — all commands below are written for it. Debian 12 works exactly the same way.
- IPv6. Make sure your provider assigns an IPv6 address — almost all of them do it for free. You will need it, and there is a dedicated section about that below.
Step 1. Buying a server
We did everything on Aeza — all screenshots come from there. Any other provider will do, the sequence of steps is the same everywhere.
Location
First, choose where the server will live. The panel shows the expected latency right away:
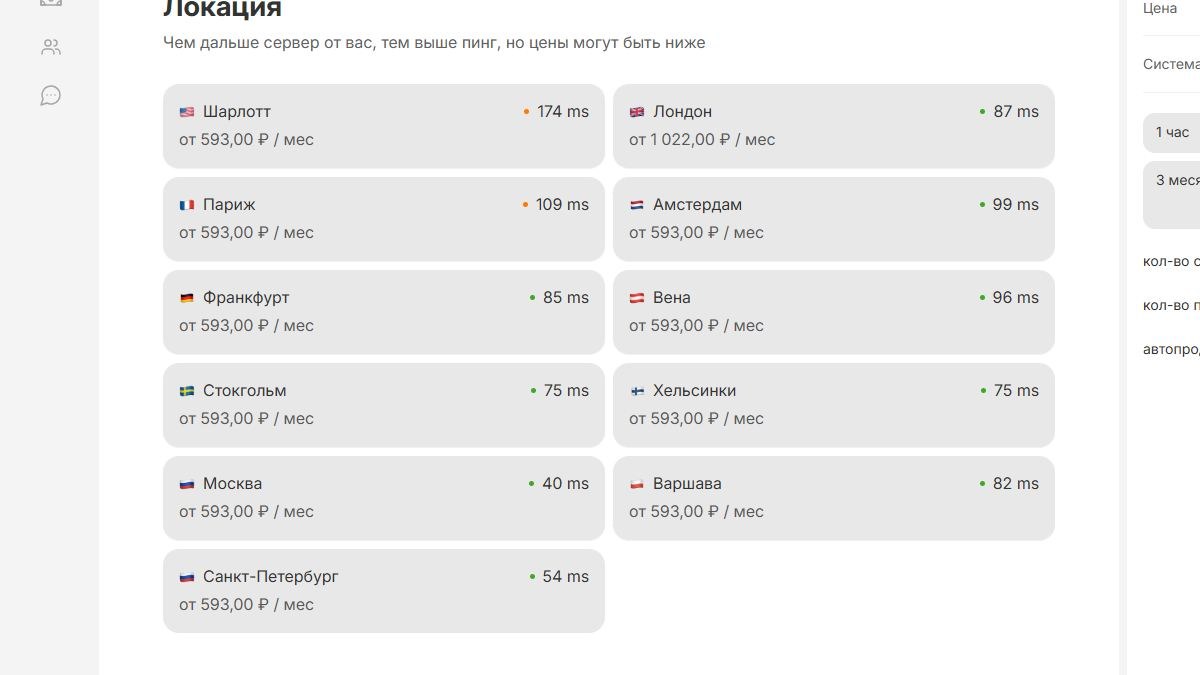
Pick a location outside the country whose restrictions you want to bypass. In our case the best speed-to-price ratio came from Stockholm and Helsinki at 75 ms; Frankfurt gives 85 ms and Amsterdam 99 ms. London turned out to be the most expensive option.
Plan
Take the smallest one — it is more than enough for a VPN:
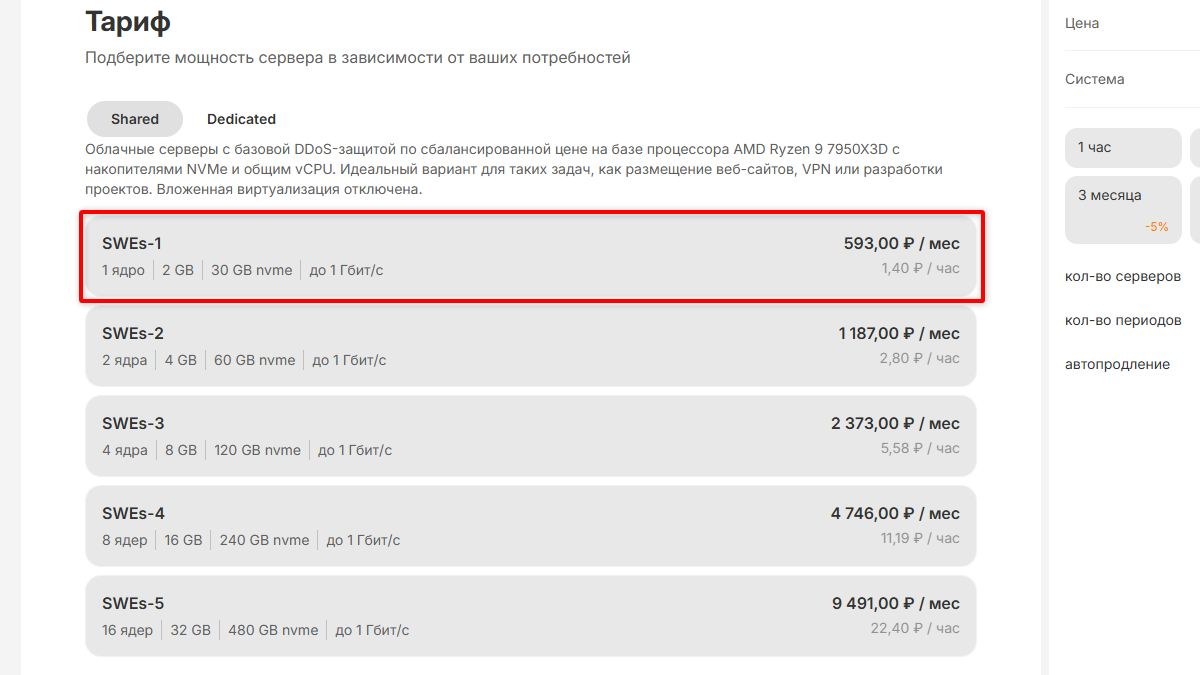
The SWEs-1 plan: 1 core, 2 GB of RAM, 30 GB NVMe and up to 1 Gbit/s — around 6 USD per month. Hourly billing is also available, which is handy if you want to try things out without paying for a whole month upfront. Paying for three months in advance comes with a discount.
Operating system
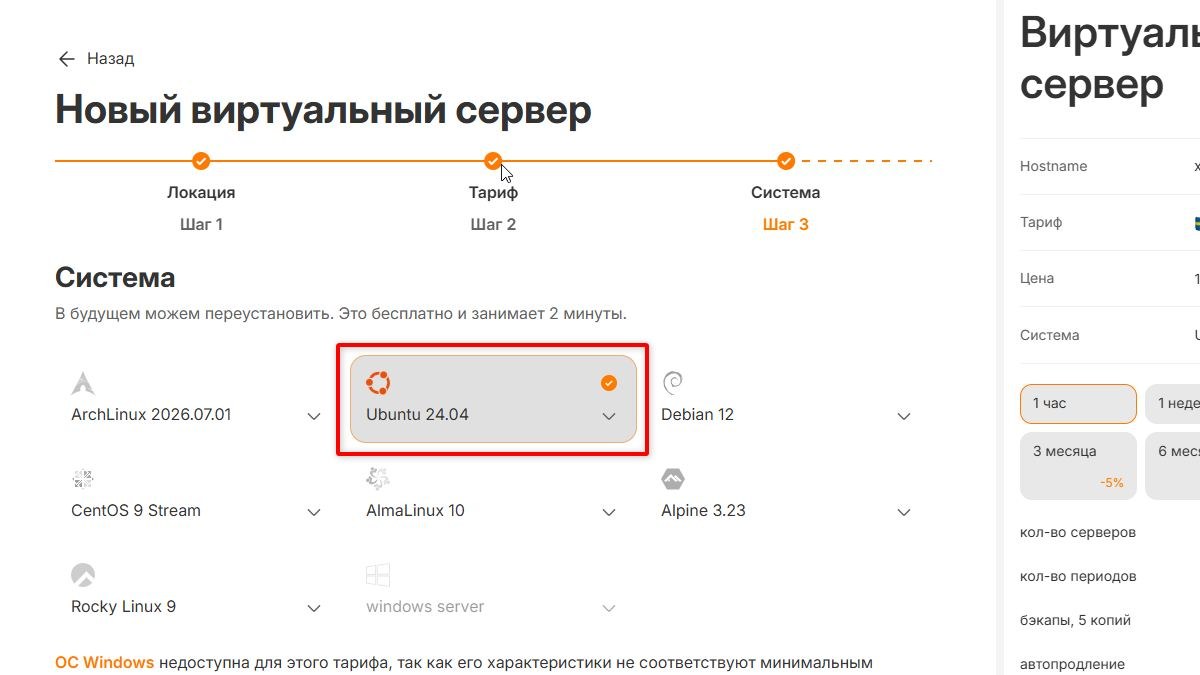
Choose Ubuntu 24.04 — every command in this article is written for it. Debian 12 in the neighbouring option works identically.
Connection details
The server is created within a couple of minutes, and the credentials appear in the panel:
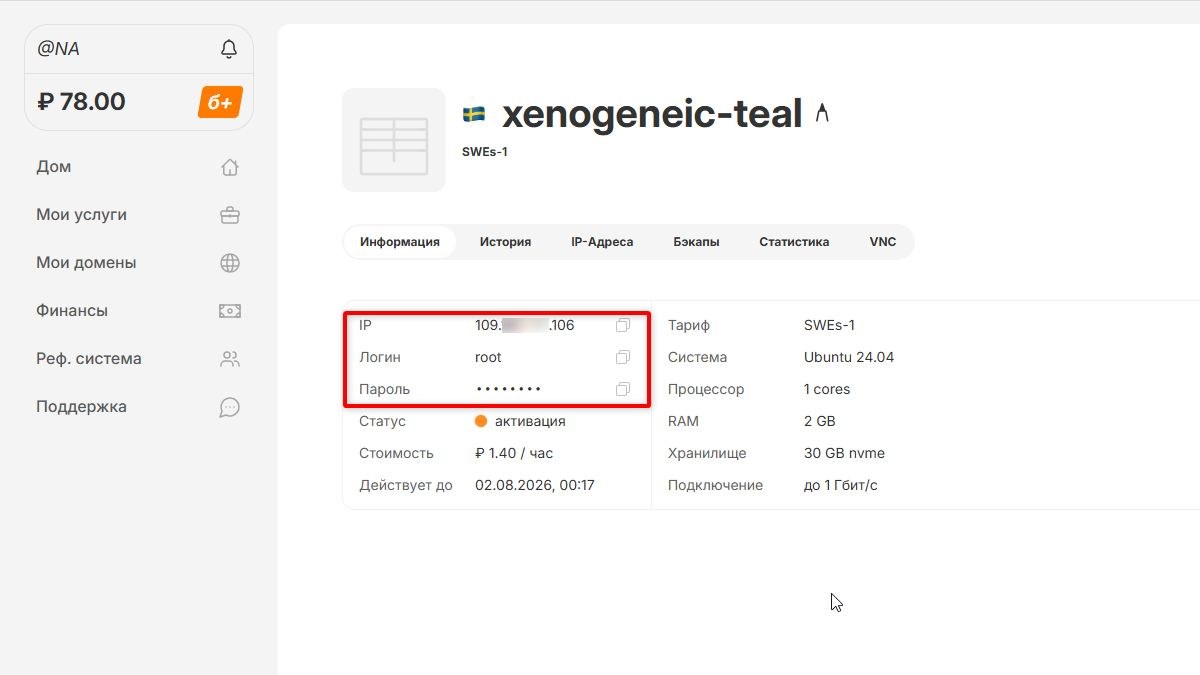
You need three things: the IP address, the login (usually root) and the password. Save them — without them you cannot reach the server.
Don't overlook IPv6
On the «IP addresses» tab you can see that an IPv6 subnet is assigned along with the server:
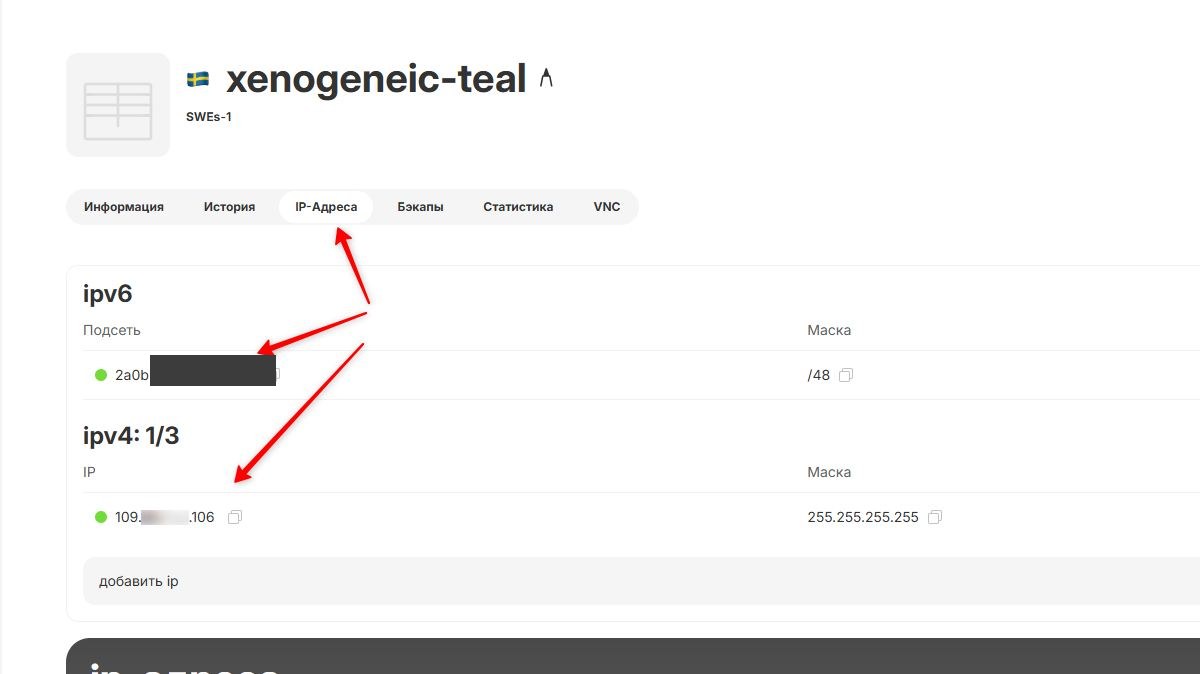
It comes for free and it is worth using: there is a separate section below explaining exactly why IPv6 matters and which services refuse to work without it.
Step 2. Domain and Cloudflare
The domain only acts as a signboard for the tunnel — you won't be hosting a website on it. Any cheap zone works, and so does any registrar: we registered ours with the same hosting provider to keep everything in one panel.
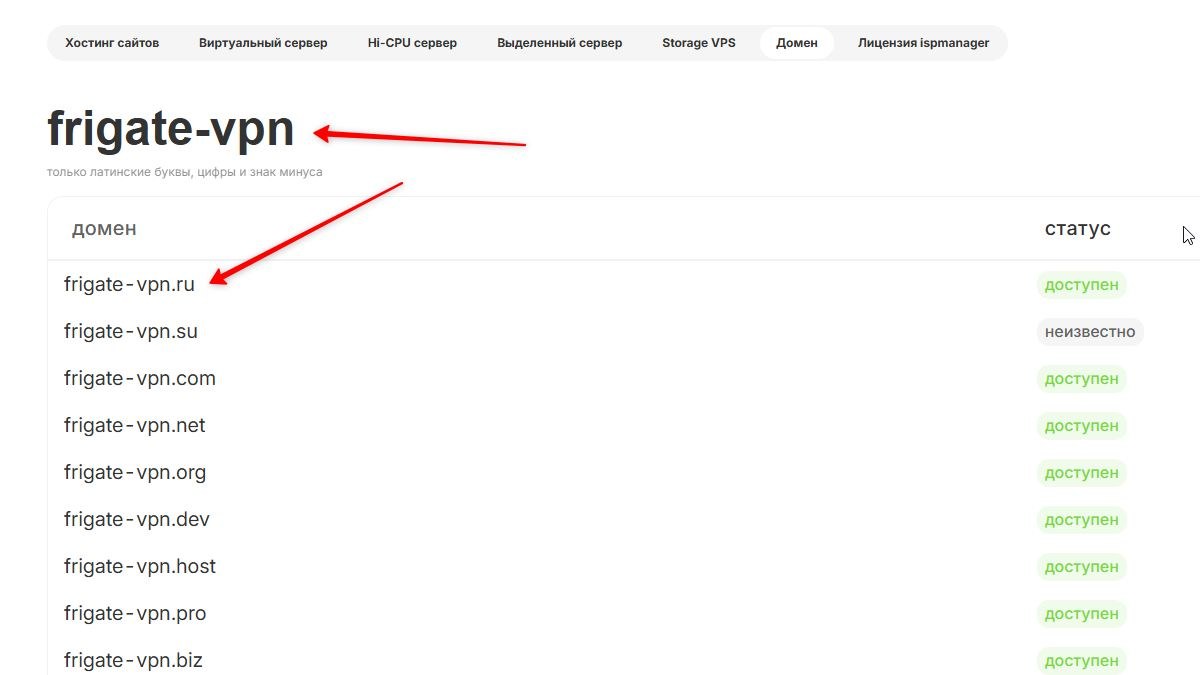
Adding the domain to Cloudflare
Sign up at dash.cloudflare.com and click Add a Site:
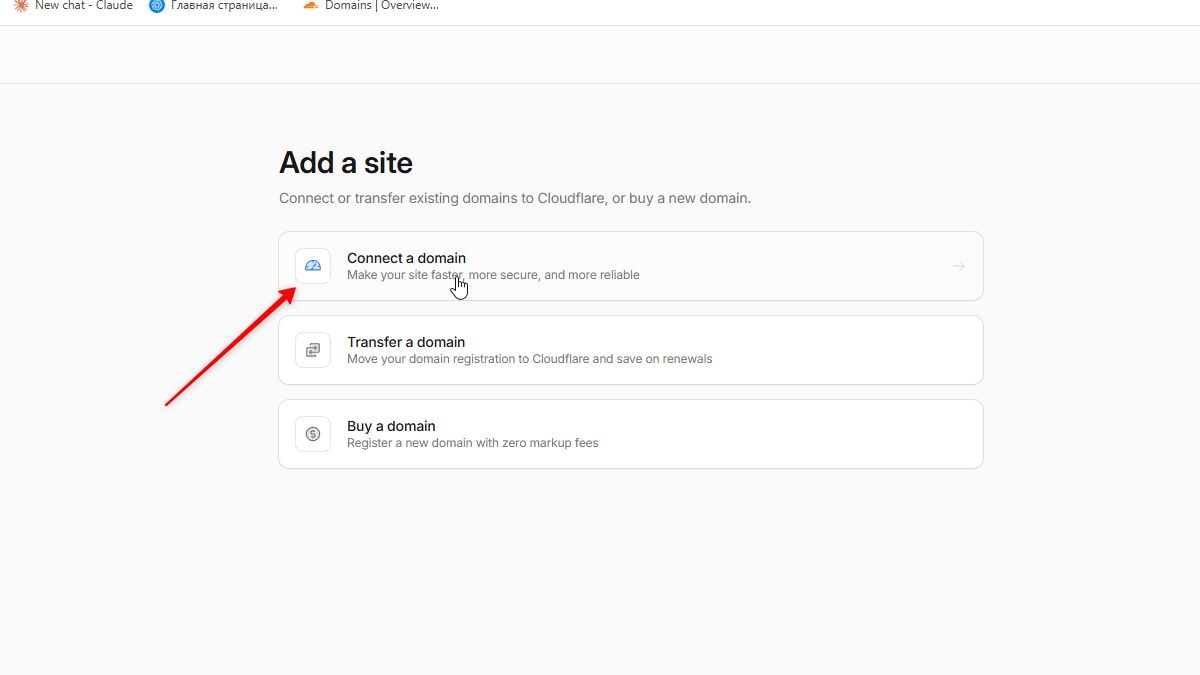
Enter the domain name, press Continue and choose the Free plan — its capabilities are sufficient:
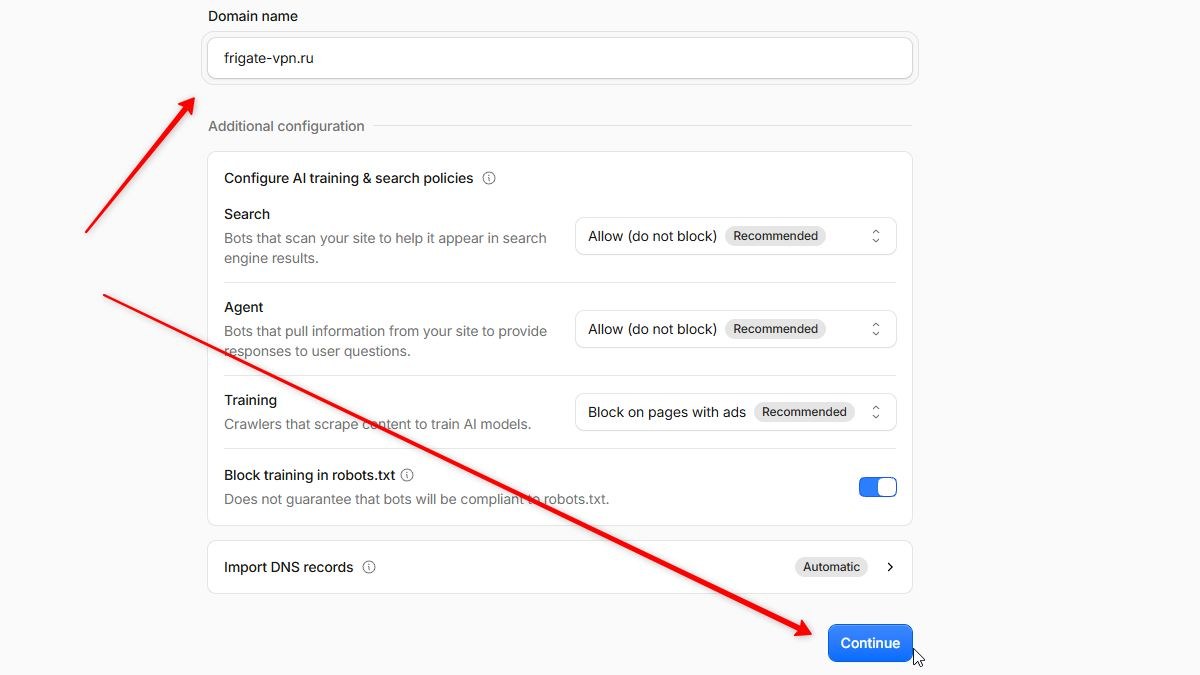
Cloudflare will scan the existing DNS records and show them as a list.
You don't need to add anything here. If the domain is new and the list is empty, that's exactly as expected — carry on. If the registrar has already created its own records (a parking page A record, for instance), they are not needed for the VPN: delete them or simply leave them, they won't interfere with the tunnel.
One point deserves special attention, because this is where beginners stumble: do not create an A record pointing to your server's IP. This contradicts the familiar logic of «a domain must point at a server», but with a tunnel the server address is never published in DNS at all — that is the whole point. The required record will be created later by the cloudflared tunnel route dns command, and it will appear in the panel with the type Tunnel and the Proxied status. That is correct, and you must not switch it to «DNS only» — the tunnel would stop working.
«DNS only» (the grey cloud) is needed in exactly one case: if besides the tunnel you keep something on the same domain that works directly over IP — a regular website, mail, or a second VPN profile on port 443. In that case the corresponding A record has to stay grey, otherwise Cloudflare will proxy it and direct connections will break.
Changing NS records at the registrar
Open the panel where the domain was bought, find the DNS server settings and replace the current values with the two addresses from Cloudflare:
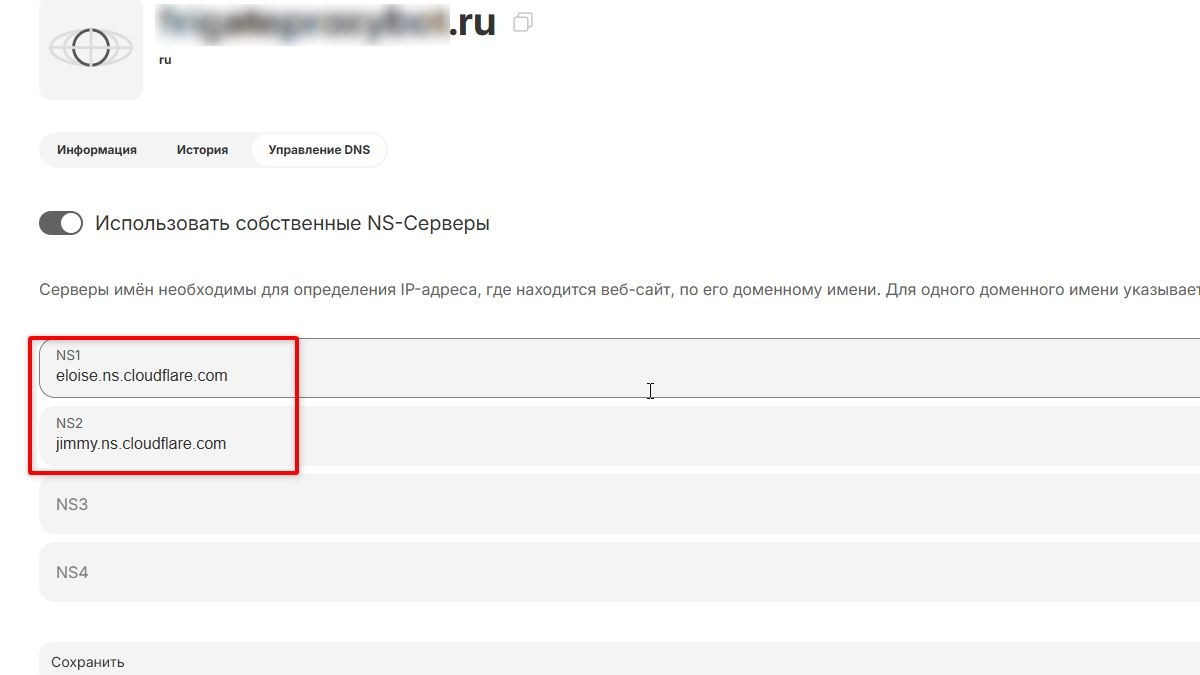
Two tips that will save you hours of waiting:
- The two addresses must differ. If you accidentally enter the same one twice, the domain registry will silently reject the change, and you will keep staring at unchanged records wondering why nothing happens. Check with your own eyes that the first and the second address are different.
- Propagation takes from 15 minutes to several hours. The registrar panel may show the new values long before the actual delegation updates.
You can check the real state from the server:
dig NS your-domain.com +traceOnce the reply contains the Cloudflare addresses, you're good. Cloudflare will also send an email confirming that the domain is active.
Step 3. Connecting to the server
Servers are managed over SSH — a secure connection to the command line.
Windows: open PowerShell (right-click Start → Terminal) and type, substituting your address:
ssh root@203.0.113.10macOS and Linux: the same command in Terminal.
Android and iOS: install the free Termius app, add a new host, enter the IP, login and password.
On the first connection the system will ask you to confirm the server's authenticity — type yes. Then enter the password. Note that nothing is displayed on screen while you type the password, not even asterisks — that's normal. A prompt like root@server:~# means you're in.
Step 4. Installing Xray
Xray is the program that will serve your connections. First update the package list and install what the installer needs:
apt update && apt install -y curl unzipDo not skip this command. On a fresh server the package list is empty, and the Xray installer fails with error: Installation of unzip failed, please check your network — even though the network is perfectly fine. We ran into this while verifying this very guide.
Now the installation itself:
bash -c "$(curl -L https://github.com/XTLS/Xray-install/raw/main/install-release.sh)" @ installVerify it:
xray versionYou should see a line like Xray 26.3.27 ... A unified platform for anti-censorship.
Step 5. Configuring Xray
We only need one value — the user identifier, which doubles as your VPN password:
xray uuidYou'll get a string like 06a8ca77-f130-44f4-9773-29b88e79e893. Copy it somewhere safe.
Open the configuration file:
nano /usr/local/etc/xray/config.jsonDelete everything inside (hold Ctrl+K until the file is empty) and paste the following, substituting your UUID:
{
  "log": { "loglevel": "warning" },
  "inbounds": [
    {
      "listen": "127.0.0.1",
      "port": 10000,
      "protocol": "vless",
      "settings": {
        "clients": [ { "id": "YOUR_UUID", "email": "main" } ],
        "decryption": "none"
      },
      "streamSettings": {
        "network": "ws",
        "wsSettings": { "path": "/ws-7f3a91" }
      },
      "sniffing": { "enabled": true, "destOverride": ["http", "tls"] }
    }
  ],
  "outbounds": [
    { "tag": "v4", "protocol": "freedom", "settings": { "domainStrategy": "UseIPv4v6" } },
    { "tag": "v6", "protocol": "freedom", "settings": { "domainStrategy": "UseIPv6v4" } }
  ],
  "routing": {
    "rules": [
      {
        "type": "field",
        "domain": ["domain:claude.ai", "domain:claude.com", "domain:anthropic.com"],
        "outboundTag": "v6"
      }
    ]
  }
}
Save with Ctrl+O, Enter, Ctrl+X.
Note three details. We listen on 127.0.0.1 only — this port must not be exposed, the connection arrives from the inside through the tunnel. Replace the /ws-7f3a91 path with your own random one, the less obvious the better. The block with two outbounds and a routing rule gets its own section below; for now just leave it as is.
Check and start:
xray -test -config /usr/local/etc/xray/config.json
systemctl restart xray
systemctl status xray
Important: use restart, not enable --now. The installer has already started Xray with its own empty config, so the start command does nothing — the service reports active (running), your config is never applied and the VPN doesn't work. This is the nastiest trap in the whole setup: everything looks fine while the port isn't listening at all. You can check like this:
ss -ltnp | grep 10000If the line is there, your config has been applied.
Step 6. Cloudflare Tunnel
Now we connect the server to the Cloudflare network. The server establishes an outbound connection itself — no inbound ports need to be opened, and the real IP of the server is never published anywhere.
Installation
curl -sL -o /tmp/cf.deb https://github.com/cloudflare/cloudflared/releases/latest/download/cloudflared-linux-amd64.deb
dpkg -i /tmp/cf.deb
cloudflared --version
Authorisation
cloudflared tunnel loginThe command prints a link. Open it in a browser where you are logged into Cloudflare and confirm access for your domain. The certificate will be downloaded to the server automatically — no API keys to create anywhere.
Click the confirmation immediately. If you take a few minutes, the session expires and the download fails with Failed to fetch resource while the network is perfectly healthy. The fix is to run the command again and click straight away.
Creating the tunnel
cloudflared tunnel create my-vpnThe output contains the tunnel identifier — a long string like 202d14e6-f484-4c06-bcc0-63e96faad983. Now create the configuration file:
nano /root/.cloudflared/config.ymlPaste this, substituting your identifier, subdomain and path:
tunnel: YOUR_TUNNEL_ID
credentials-file: /root/.cloudflared/YOUR_TUNNEL_ID.json

ingress:
  - hostname: vpn.your-domain.com
    service: http://127.0.0.1:10000
  - service: http_status:404
The last line is mandatory: everything except the specified subdomain will receive a plain 404.
Binding the subdomain and starting up
The DNS record is created automatically, there is no need to open the Cloudflare panel:
cloudflared tunnel route dns my-vpn vpn.your-domain.com
cloudflared service install
systemctl enable --now cloudflared
systemctl status cloudflared
Check the journal:
journalctl -u cloudflared -n 20 --no-pagerYou should see Registered tunnel connection lines — usually four, one per connection to the nearest Cloudflare nodes. They also reveal the city: location=fra19 means Frankfurt.
What it looks like in the Cloudflare panel
Open the DNS section of your domain — there should be exactly one record, created automatically:
| Name | Type | Content | Status |
|---|---|---|---|
vpn.your-domain.com | Tunnel | your tunnel name | Proxied |
If the record is there and the tunnel reports active, the server side is completely ready. No other records are required for the VPN to work.
Step 7. Connecting your devices
Build the connection link from this template, substituting your UUID, subdomain and path:
vless://YOUR_UUID@vpn.your-domain.com:443?encryption=none&security=tls&sni=vpn.your-domain.com&fp=safari&alpn=http%2F1.1&type=ws&host=vpn.your-domain.com&path=%2Fws-7f3a91#My-VPNWhat matters here:
| Parameter | Value |
|---|---|
sni and host | your subdomain, both identical |
path | the path from the config, the slash is written as %2F |
alpn=http/1.1 | mandatory, otherwise the client tries HTTP/2 and WebSocket fails |
flow | absent — it is not used with WebSocket |
Android
You need v2rayNG. It may be unavailable in Google Play, so the reliable route is downloading the APK from the project releases page on GitHub. There are many files there — pick arm64-v8a, it fits virtually every modern phone:
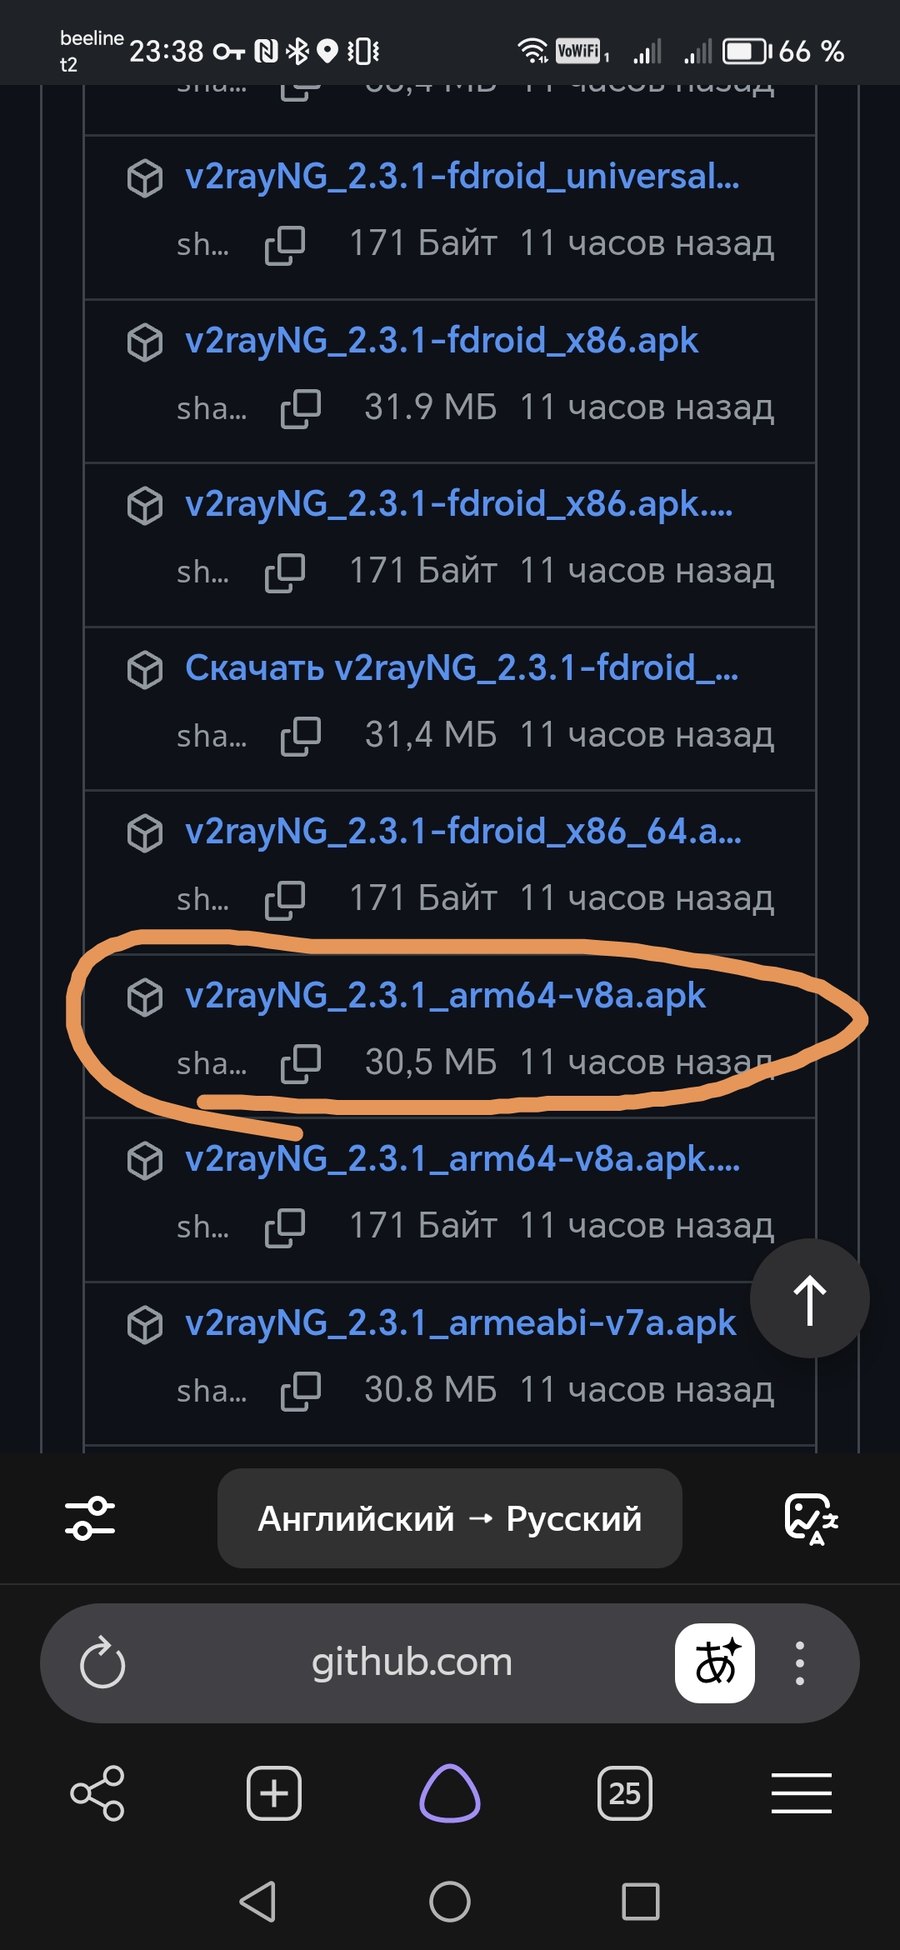
After installing, copy your link, tap «+» in the top right corner and choose «Import from clipboard»:
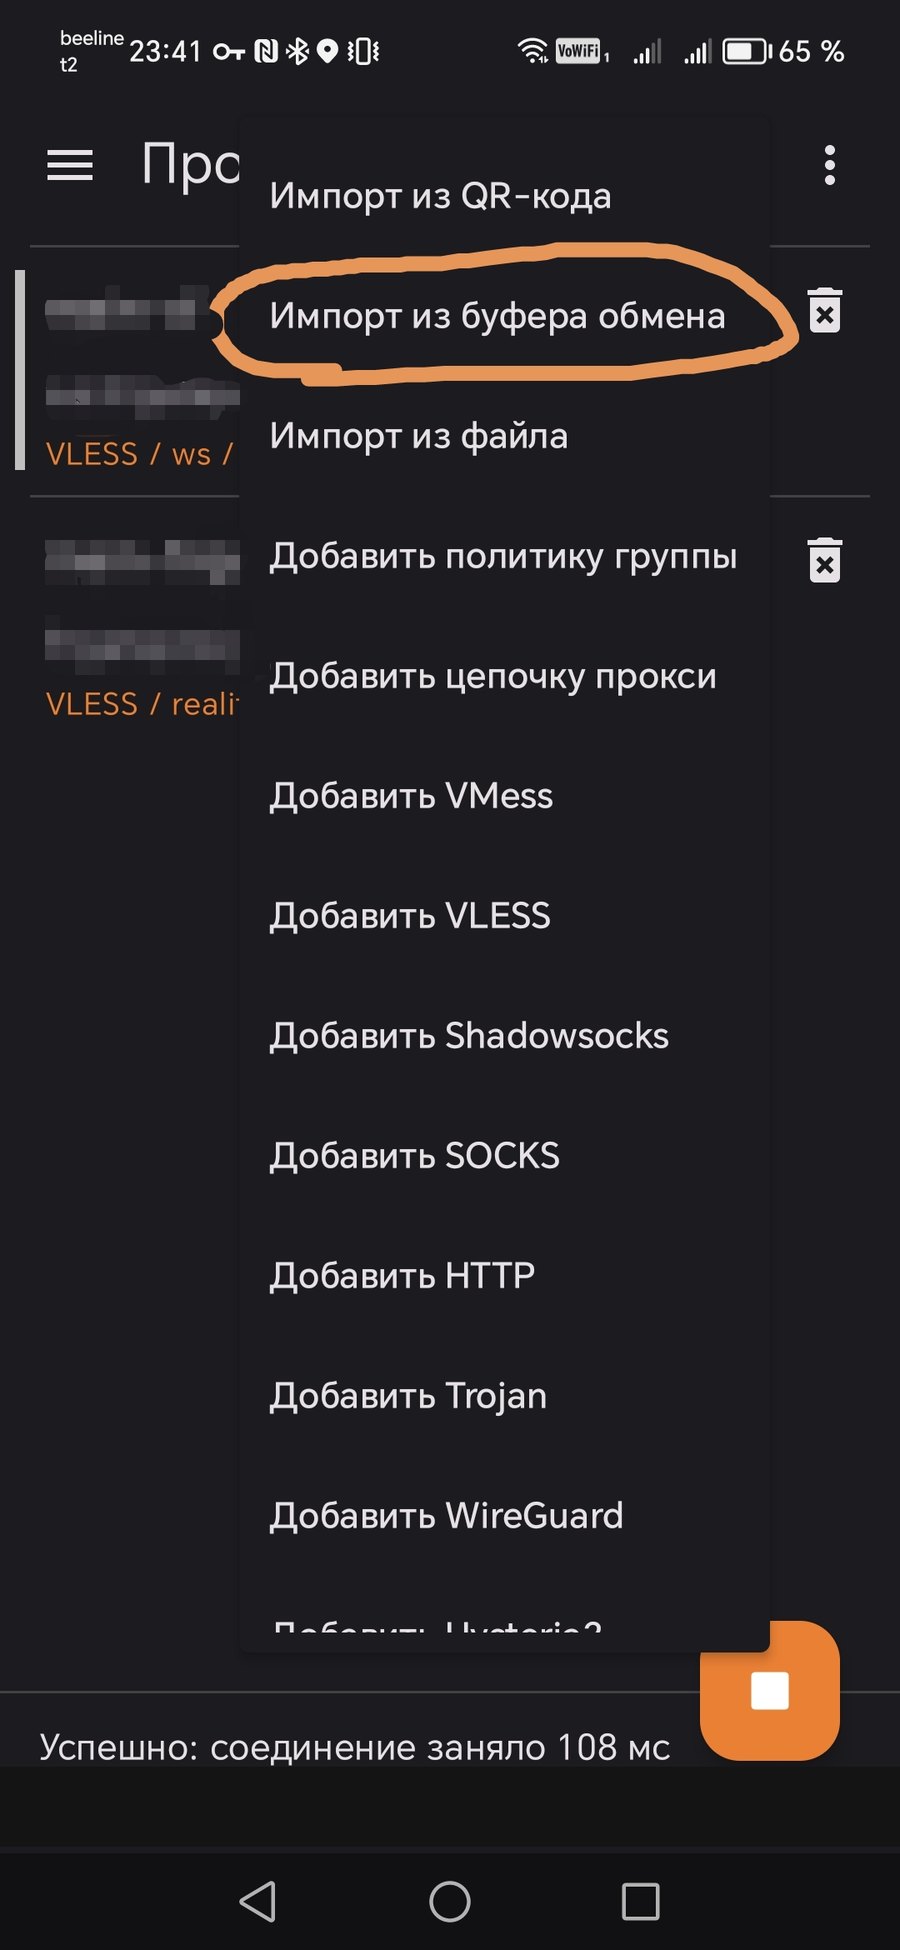
The profile appears in the list — select it and tap the round button in the bottom right. A line like «Success: connection took 108 ms» with the server country will appear at the bottom of the screen.
iPhone and iPad
Streisand, V2Box or Shadowrocket (the latter is paid) — importing from the clipboard works the same way.
Windows
v2rayN from the project releases page on GitHub: launch it, press Ctrl+V to import the link, then pick «Global» mode from the tray.
macOS
V2Box from the App Store or Hiddify.
Step 8. Verifying
Connect and search for «my ip» — the search engine will show both of your addresses right away:
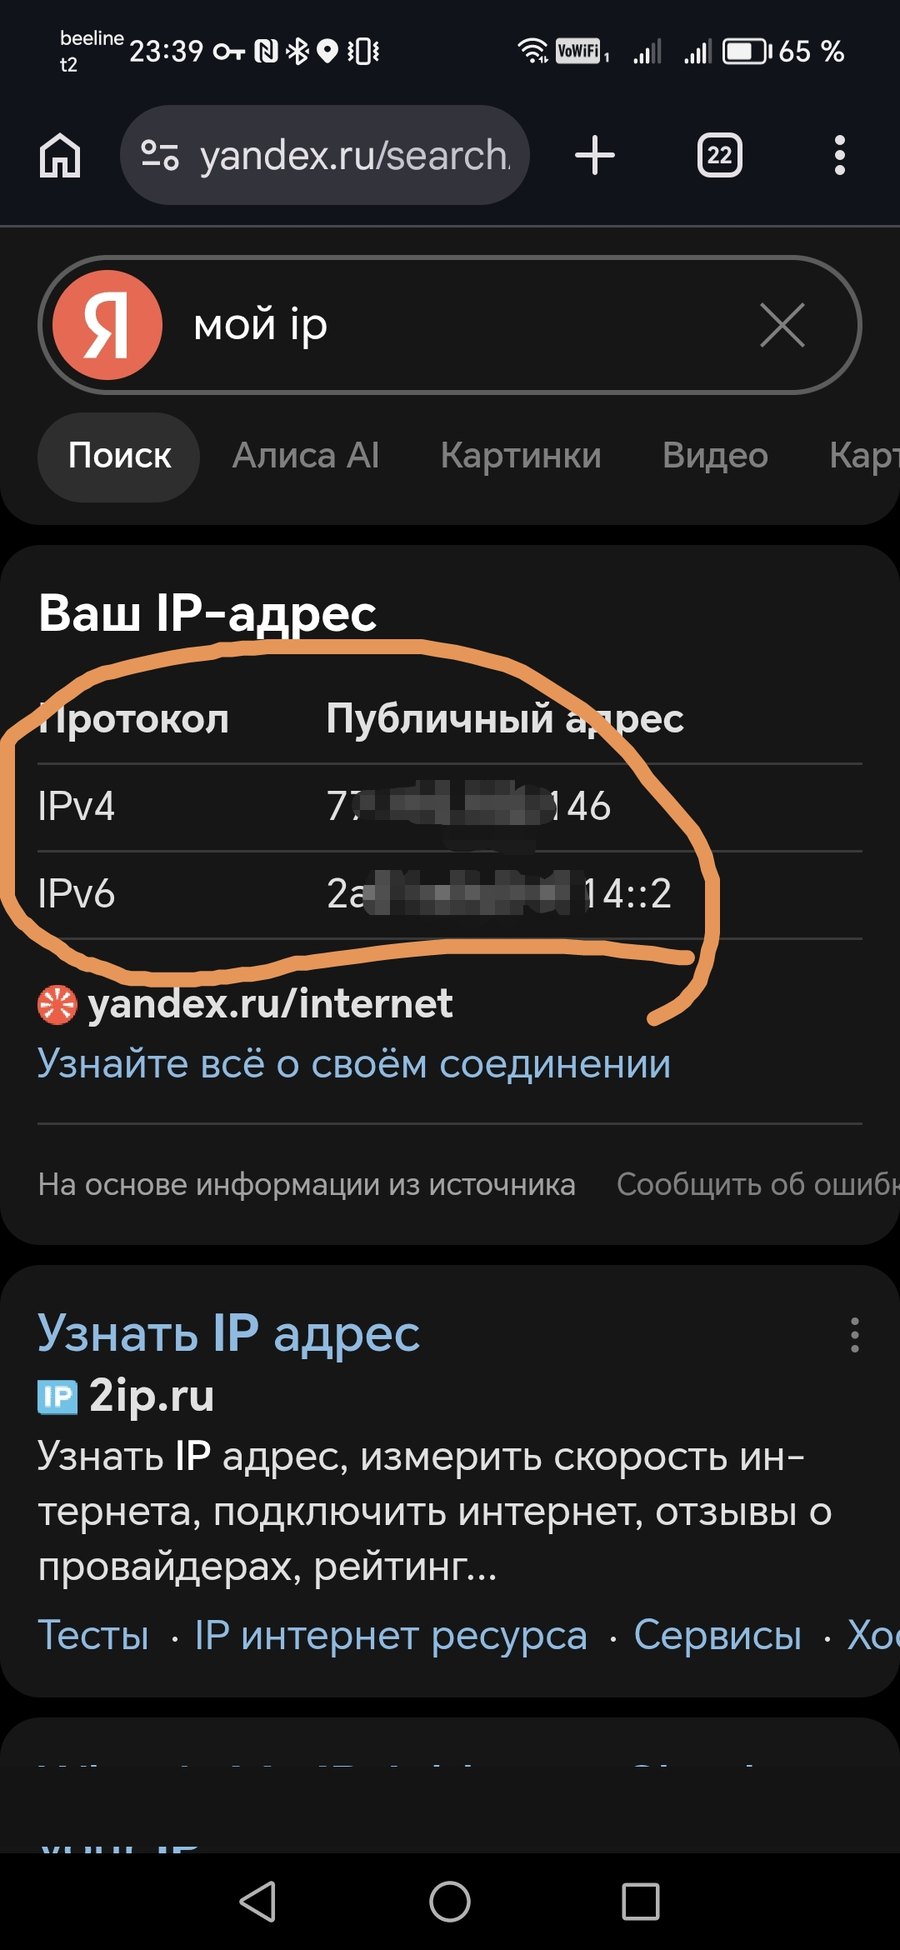
You should see your server's addresses, not your home ones. Any other service works too — ifconfig.co, whatismyip.com.
Be sure to test both types of network: Wi-Fi first, then mobile data. Mobile networks are where problems usually surface, if there are any.
IPv6: why it matters and why the config has two outbounds
Let's return to that outbounds block with the v4 and v6 tags. It isn't decoration — it solves a very specific problem.
Some services treat data-centre IPv4 addresses with suspicion. A telling example is the Claude app on Android: over the server's regular IPv4 it refuses to open at all, while the same site works fine in a browser. The reason is that Cloudflare serves such addresses a JavaScript challenge («Just a moment...»); a browser solves it silently, a native app cannot and hits an error.
Over the same server's IPv6 address there is no challenge. Hence the configuration: all traffic goes over IPv4, while the Claude domains go over IPv6. You can verify it through the tunnel:
curl --socks5-hostname 127.0.0.1:PORT https://claude.ai/cdn-cgi/traceThe reply should contain the server's IPv6 address, while ordinary sites keep seeing the IPv4 one.
Adding your own domains to the IPv6 rule
You decide which domains go over IPv6. Open the config:
nano /usr/local/etc/xray/config.jsonFind the routing block and add the domains you need to the domain array, separated by commas:
"routing": {
  "rules": [
    {
      "type": "field",
      "domain": [
        "domain:claude.ai",
        "domain:claude.com",
        "domain:anthropic.com",
        "domain:example.com",
        "domain:another-service.net"
      ],
      "outboundTag": "v6"
    }
  ]
}
Watch the commas: they go between the lines but never after the last one — that is the most common editing mistake, and it makes the config unreadable.
The prefix before the domain defines how it is matched:
| Entry | What it matches |
|---|---|
domain:example.com | the domain and all its subdomains: example.com, api.example.com, cdn.example.com |
full:example.com | an exact match only, subdomains are untouched |
keyword:example | any domain containing that word |
In most cases domain: is what you want — services almost always use several subdomains for their API, images and authentication, and all of them should travel the same route. If you send only the main domain over IPv6 while the API stays on IPv4, the app may behave oddly: some requests go through, others don't.
After editing, always validate the syntax and restart:
xray -test -config /usr/local/etc/xray/config.json
systemctl restart xray
If you get an error instead of Configuration OK, it is almost certainly an extra or a missing comma. Xray keeps running with the old configuration until restarted, so you won't lose connectivity.
Checking that a domain goes over IPv6
For sites behind Cloudflare there is a convenient service page — connect through the VPN and open:
https://the-domain-you-check/cdn-cgi/traceThe ip= line contains the address the site sees. If it holds your server's IPv6 address, the rule works. For sites without Cloudflare any IP checking service will do: compare what it shows during normal browsing and when visiting the service in question.
Another way is to look at the server itself and see which protocol the connection used:
tail -f /var/log/xray/access.logConnection lines carry a [v4] or [v6] marker, so you can see the chosen route for every request at a glance. This requires the access log to be enabled, as described in the troubleshooting section.
Sending all traffic over IPv6
If you want all traffic to go over IPv6, replace the outbounds block with a single line and delete the routing block:
"outbounds": [
  { "protocol": "freedom", "settings": { "domainStrategy": "UseIPv6v4" } }
]
Mind the side effect: IP checking sites will then show the IPv6 address instead of the IPv4 one you bought, and providers' IPv6 subnets are often geolocated differently from their IPv4 ranges — you may end up «in another country».
If something doesn't work
Enable verbose logging: replace the log block in the config with the one below, restart Xray and try connecting.
"log": {
  "loglevel": "info",
  "access": "/var/log/xray/access.log",
  "error": "/var/log/xray/error.log"
}
Then watch what happens:
tail -f /var/log/xray/error.logThe main scenarios:
| What you see | Cause | Fix |
|---|---|---|
| the log is empty, the tunnel never came up | a problem with cloudflared | systemctl status cloudflared, check journalctl |
| connected, but sites don't load | app settings | see below |
| works, then drops | Android battery saver | see below |
You can also check the tunnel from the outside — open https://vpn.your-domain.com in a browser. You should get a 404 page from Cloudflare: that means the domain resolves, the tunnel is up, and only the path is wrong — which is exactly how it should behave.
Connected, but sites don't open
The cause is almost always in the app. Check three settings:
- Per-app proxy. If «proxy selected apps only» is enabled and your browser isn't on the list, only the app's own service requests travel through the tunnel. It looks exactly like a completely broken VPN. Turn it off.
- Routing mode — set it to global.
- Fragmentation (Fragment) — turn it off. It is recommended everywhere as an anti-blocking measure, but here it only gets in the way.
The connection drops on its own
If the VPN works and then stops for no apparent reason, the battery saver is to blame. Xiaomi, Honor, Huawei, OPPO and Samsung are especially aggressive: they kill the background VPN service to save power.
Allow the app to autostart and run in the background, remove battery restrictions (set «No restrictions»), and pin the app card in the recents list.
REALITY on port 443: a faster alternative, but not for everyone
If you search for guides on running your own VPN, almost all of them suggest a different setup — VLESS + REALITY straight on port 443, with no domain and no Cloudflare. It is simpler to configure and faster in use, because traffic takes the shortest path without a detour through a CDN.
We configured that as well on the same server, and here is the honest outcome: it did not work on every network. From one home connection REALITY never came up at all, while the Cloudflare tunnel from the very same device worked immediately.
The reason lies in the size of the first packet. The client sends a TLS ClientHello, and its size depends on which browser it emulates. We measured this on a live server:
| Emulated browser | ClientHello size |
|---|---|
fp=firefox | 1893 bytes |
fp=chrome | 1824 bytes |
fp=randomized | 517 bytes |
Modern Chrome and Firefox add a post-quantum key to the handshake, inflating it to nearly two kilobytes. On an ordinary network this is irrelevant. But on channels with a reduced segment size — mobile networks, home connections behind a provider tunnel, corporate networks — such a greeting no longer fits into a single packet and gets split into two. And this is where it gets interesting: the second chunk often simply never arrives. The connection hangs, and the server log fills with failed to read client hello.
The fp=randomized parameter helps: the greeting shrinks threefold and fits into one packet. But even that is not a silver bullet — in our test the connection then stumbled on the authentication stage instead.
The Cloudflare setup is immune to this by design: the phone establishes an ordinary TLS connection with the nearest CDN node, there is nothing special inside the greeting, and filters have nothing to latch onto. That is why this guide picks the tunnel as the main option, even though it takes more effort.
Maintenance
Adding a user
To share access with family, don't hand out your own link — create a separate profile. Generate a new UUID with xray uuid and add it to the clients array:
"clients": [
  { "id": "FIRST_UUID", "email": "main" },
  { "id": "SECOND_UUID", "email": "mom" }
]
After systemctl restart xray the profile is live. The link is built from the same template, only the UUID changes.
Adding a second server to the same domain
A single domain serves any number of servers — each gets its own subdomain (vpn2, vpn3 and so on). On the new server you repeat steps 4-6, creating the tunnel with a different name and a different subdomain.
Handy commands
systemctl status xray          # Xray state
systemctl status cloudflared   # tunnel state
systemctl restart xray         # restart after editing the config
journalctl -u cloudflared -n 50 --no-pager
And a rule that will save you hours: after every server restart, reconnect manually in the app. Old connections are dropped, and the client doesn't always notice — from the outside it looks like «it suddenly stopped working».
When your own VPN isn't the right tool
A personal VPN solves its own task perfectly — accessing websites through a channel of your own. But it has a boundary worth knowing about.
To any website your traffic looks like data-centre traffic: the IP belongs to a hosting provider, and that is visible in public databases. This doesn't matter for ordinary browsing, but wherever a site evaluates whether a visitor looks like a real person — sign-ups, marketplaces, social networks, advertising — a server address stands out immediately. Your TCP fingerprint gives you away as well: passive detectors tell a Linux server from a phone by connection parameters alone, without ever looking inside the traffic.
If that is precisely your goal — to look like an ordinary mobile network user — you need a different instrument. Mobile proxies work through real SIM cards in carrier networks: to the remote side such traffic is mobile subscriber traffic, because that is physically what it is. We covered how this infrastructure works from the inside in our article about the proxy farm.
The two approaches coexist nicely: your own VPN for personal access to websites and protection on public networks, mobile proxies for tasks where what matters is how the remote side sees you.