Netflix has been blocked in Russia since March 2022 — after the streaming service left the Russian market. But you can still watch your favorite shows: just set up SmartDNS on an affordable Kazakhstani VPS and link a virtual card. This article covers the first part — setting up SmartDNS from scratch.
What is SmartDNS and why it's better than VPN
VPN routes all traffic through a server: speed drops, latency increases, and Netflix often blocks known VPN addresses. SmartDNS works differently: it only substitutes DNS responses for the required domains (netflix.com and related ones), while the video itself loads directly from Netflix servers through your regular internet connection. The result — full streaming speed with no latency.
The scheme is simple:
- Your TV asks the DNS server: "What is the IP of netflix.com?"
- Our SmartDNS responds with its own IP (the Kazakhstani VPS)
- The TV establishes a TLS connection to Netflix through this IP
- Netflix sees the Kazakhstani IP and opens the full catalog
- The Netflix video stream goes directly — without a proxy
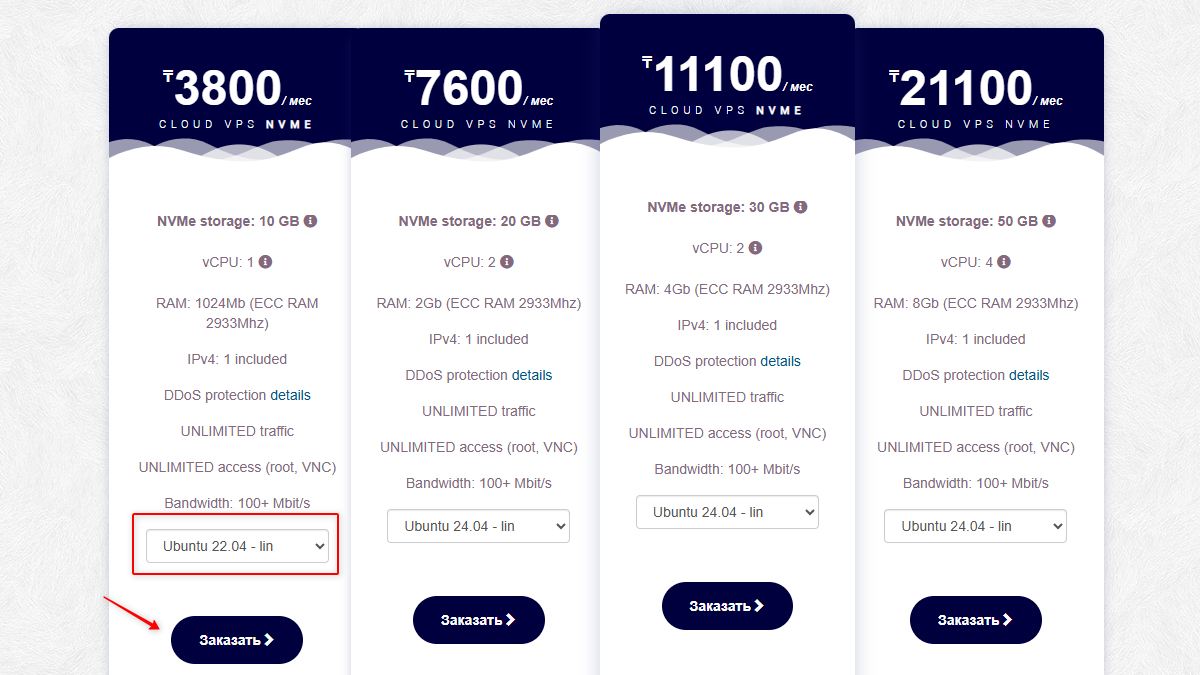
Step 1. Registration and plan selection on gohost.kz
We need a VPS with a Kazakhstani IP. We use gohost.kz — a Kazakhstani hosting provider with a minimum plan starting from 3,800 tenge (~680 rubles) per month.
Follow the link, register, and select the Cloud VPS / VDS → Cloud VPS NVMe plan. The cheapest option is perfectly suited for SmartDNS — traffic is nearly zero (only DNS request headers).
Select the operating system Ubuntu 22.04:
Step 2. Paying for the server
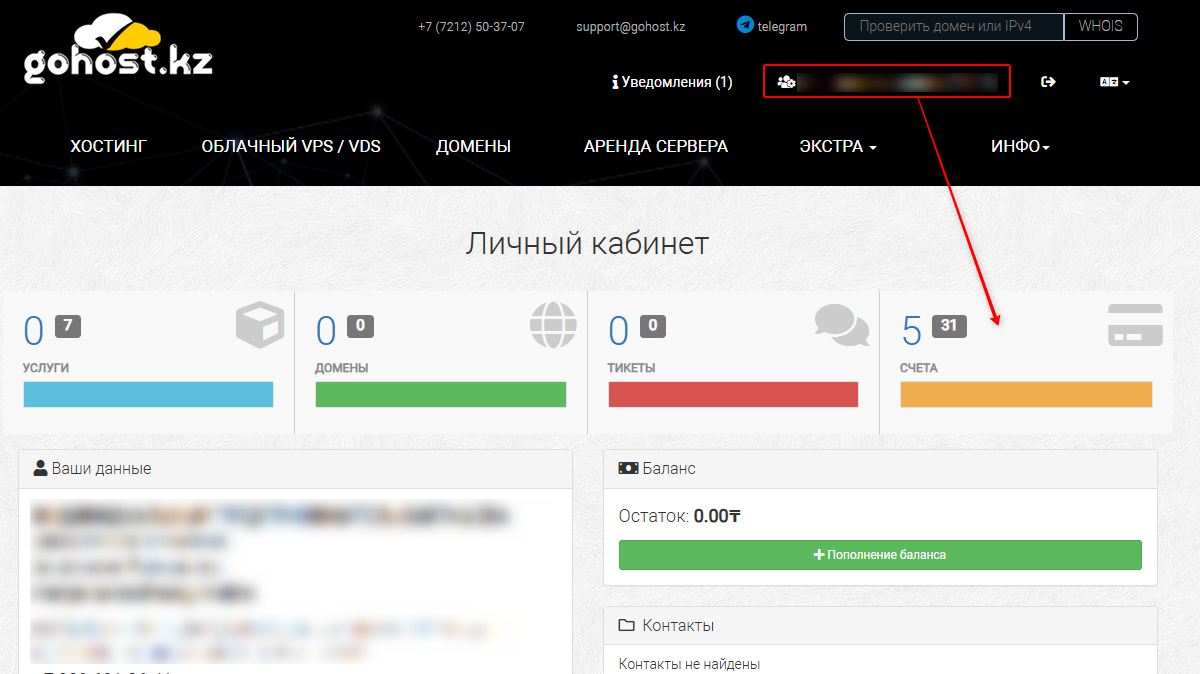
After clicking "Order" you will be asked to log in or register. After registration the system will create an invoice, but proceeding directly to payment from the catalog may not work due to website quirks.
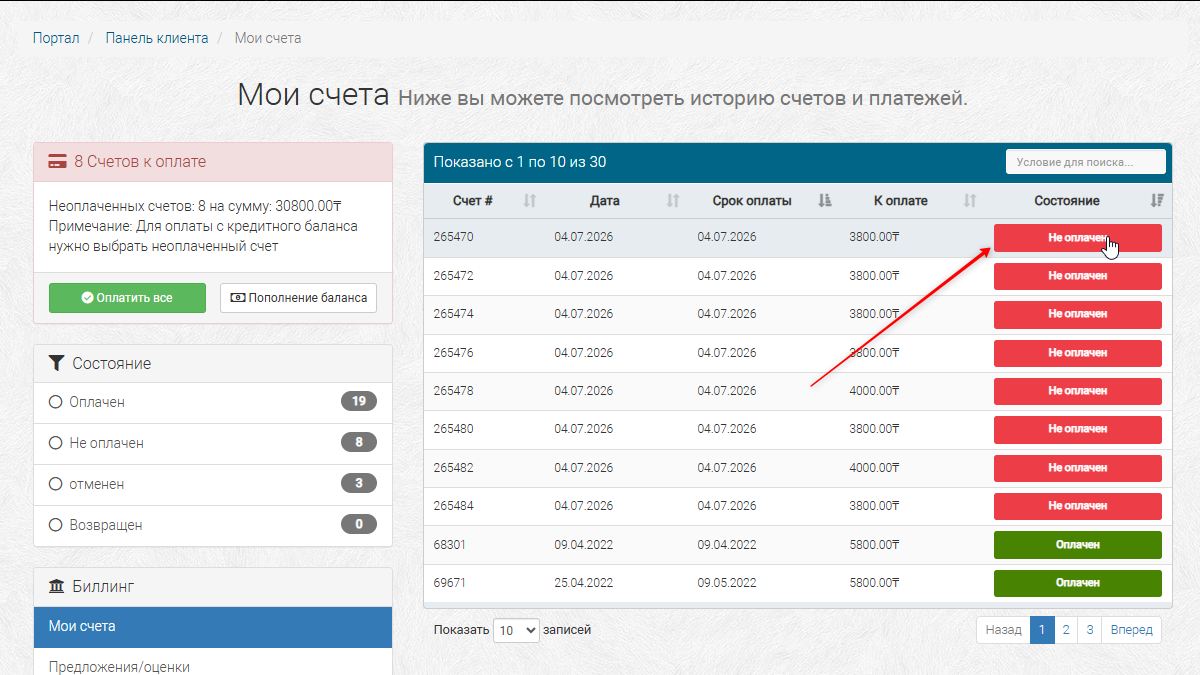
The working method: open your Personal account and click on the Invoices section (the number in the top right corner):
You will see a list of unpaid invoices. Click on the relevant invoice (3800₸):
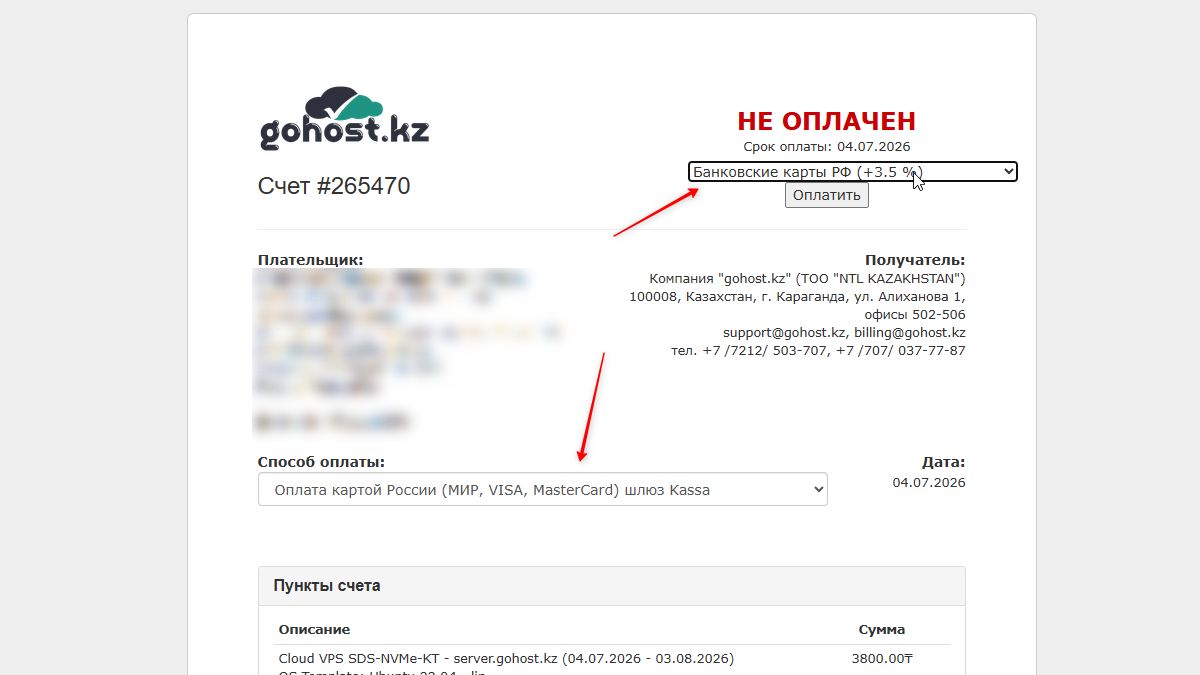
The invoice page opens. Select a payment method. To pay with a Russian card via SBP (Fast Payment System), select "Russian bank cards (+3.5%) via FreeKassa gateway" or any other convenient method:
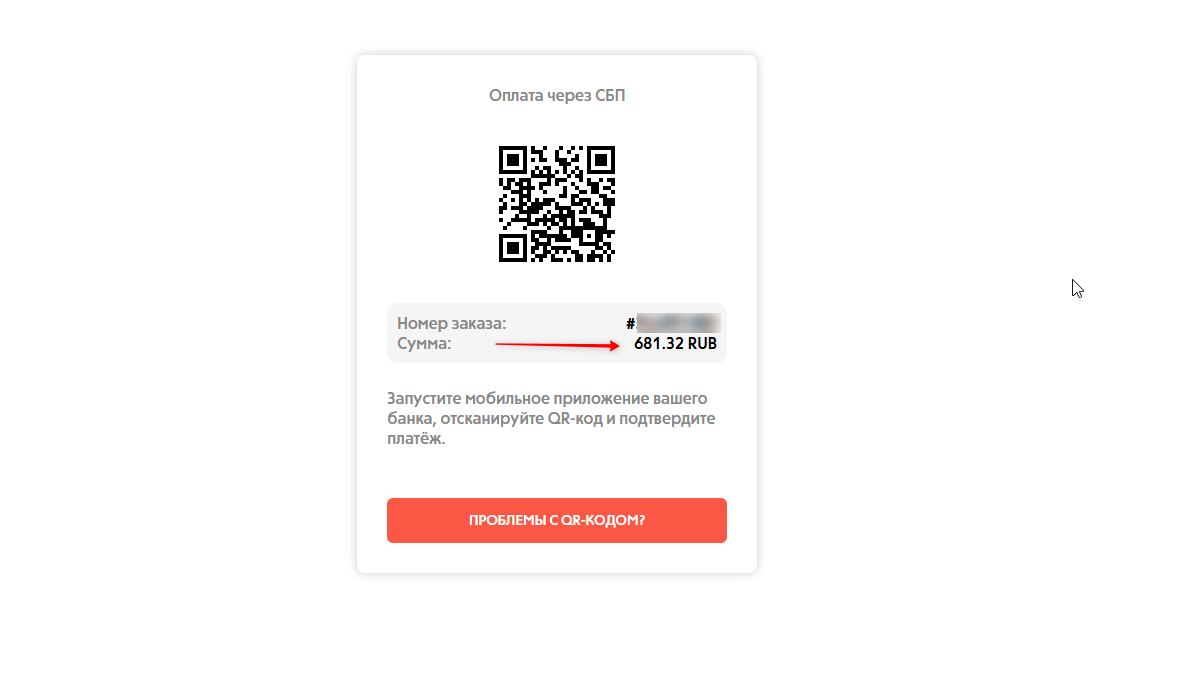
Click "Pay" — a QR code will appear for payment via SBP (Fast Payment System). Scan it with your banking app:
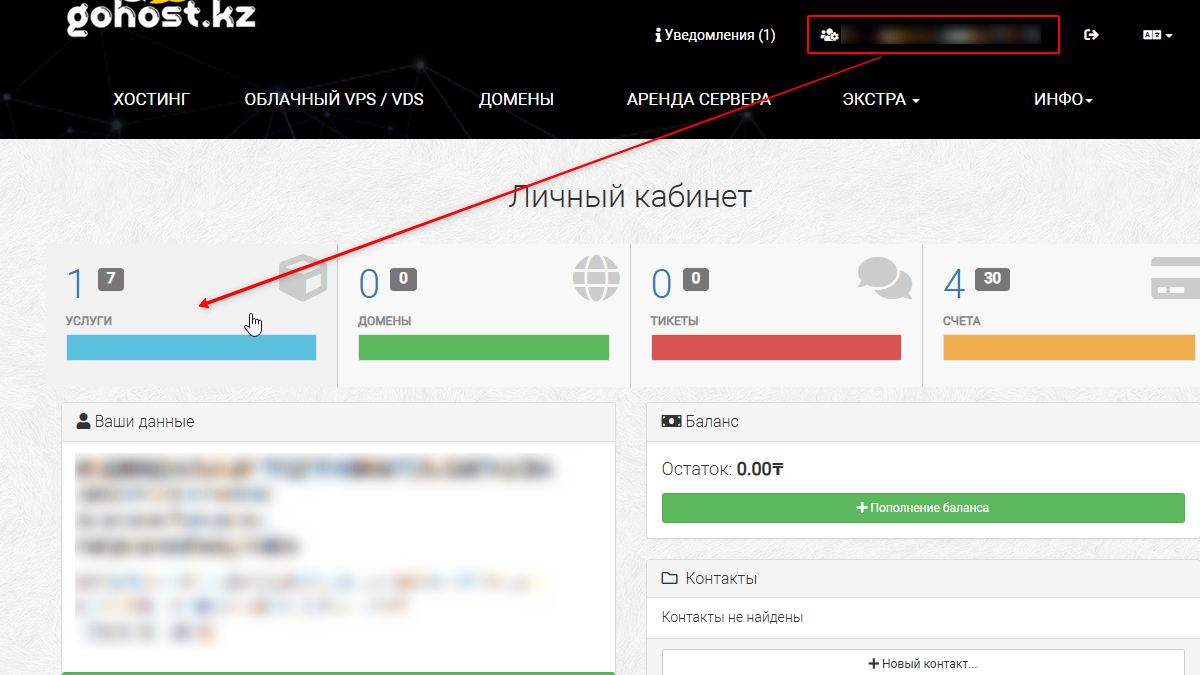
After payment, 1 active service will appear in your personal account:
Step 3. SSH connection credentials
An email will arrive with server details — IP address, root login, and password:
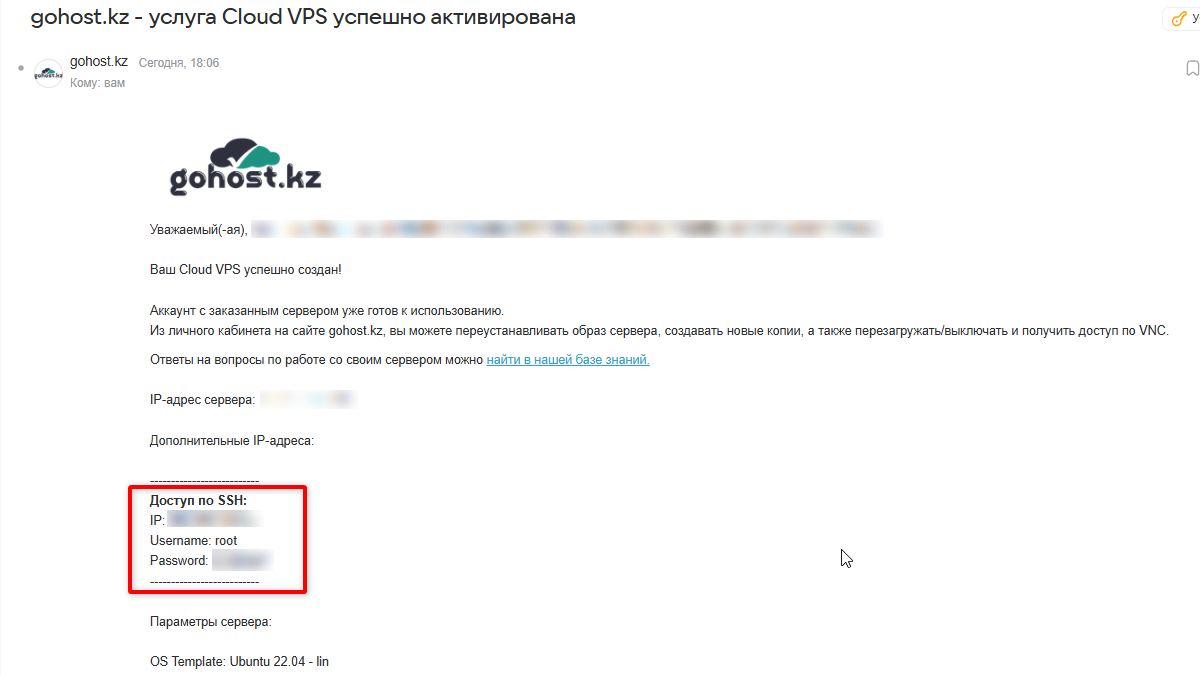
Save your server's IP address — you will need it in the configuration files and when setting up devices.
Step 4. Installing Docker on the server
Connect to the server via SSH. If you are on Windows — use PuTTY or the built-in Windows 10/11 terminal. On Mac/Linux open a terminal and enter:
ssh root@YOUR_SERVER_IPEnter the password from the email. After logging in, install Docker and docker-compose:
apt update && apt install -y docker.io docker-composeVerify that Docker is running:
docker --versionStep 5. Configuring SmartDNS
Create a working directory and navigate into it:
mkdir ~/netflix-proxy && cd ~/netflix-proxy
mkdir docker-sniproxy
Create the DNS server configuration file dnsmasq.conf:
cat > dnsmasq.conf << 'EOF'
port=53
listen-address=0.0.0.0
bind-interfaces
server=8.8.8.8
server=8.8.4.4

address=/netflix.com/YOUR_SERVER_IP
address=/nflximg.net/YOUR_SERVER_IP
address=/nflximg.com/YOUR_SERVER_IP
address=/nflxvideo.net/YOUR_SERVER_IP
address=/nflxso.net/YOUR_SERVER_IP
address=/nflxext.com/YOUR_SERVER_IP
address=/fast.com/YOUR_SERVER_IP
EOF
Create the proxy server configuration docker-sniproxy/sniproxy.conf:
cat > docker-sniproxy/sniproxy.conf << 'EOF'
user daemon

pidfile /var/run/sniproxy.pid

error_log {
    syslog daemon
    priority notice
}

listen 80 {
    proto http
    table http_hosts
}

listen 443 {
    proto tls
    table https_hosts
}

table http_hosts {
    .* *
}

table https_hosts {
    .* *
}

resolver {
    nameserver 8.8.8.8
    mode ipv4_first
}
EOF
Create the docker-compose.yml file — it will launch both services in containers:
cat > docker-compose.yml << 'EOF'
version: '2'
services:
  dnsmasq-service:
    image: andyshinn/dnsmasq:latest
    container_name: dnsmasq
    privileged: true
    network_mode: host
    volumes:
      - ./dnsmasq.conf:/etc/dnsmasq.conf:ro
    restart: always
  sniproxy-service:
    image: ab77/sniproxy:latest
    container_name: sniproxy
    privileged: true
    network_mode: host
    volumes:
      - ./docker-sniproxy/sniproxy.conf:/etc/sniproxy.conf
    restart: always
EOF
Step 6. Starting SmartDNS and enabling autostart on reboot
Start the containers:
docker-compose up -dVerify that both containers are running:
docker psThe list should show dnsmasq and sniproxy with the status Up.
Configure autostart on server reboot via systemd:
cat > /etc/systemd/system/smartdns.service << 'EOF'
[Unit]
Description=SmartDNS Netflix
After=docker.service
Requires=docker.service

[Service]
WorkingDirectory=/root/netflix-proxy
ExecStart=/usr/bin/docker-compose up
ExecStop=/usr/bin/docker-compose down
Restart=always

[Install]
WantedBy=multi-user.target
EOF

systemctl daemon-reload
systemctl enable smartdns
SmartDNS is ready. Now you need to set your server's IP as the DNS on your device.
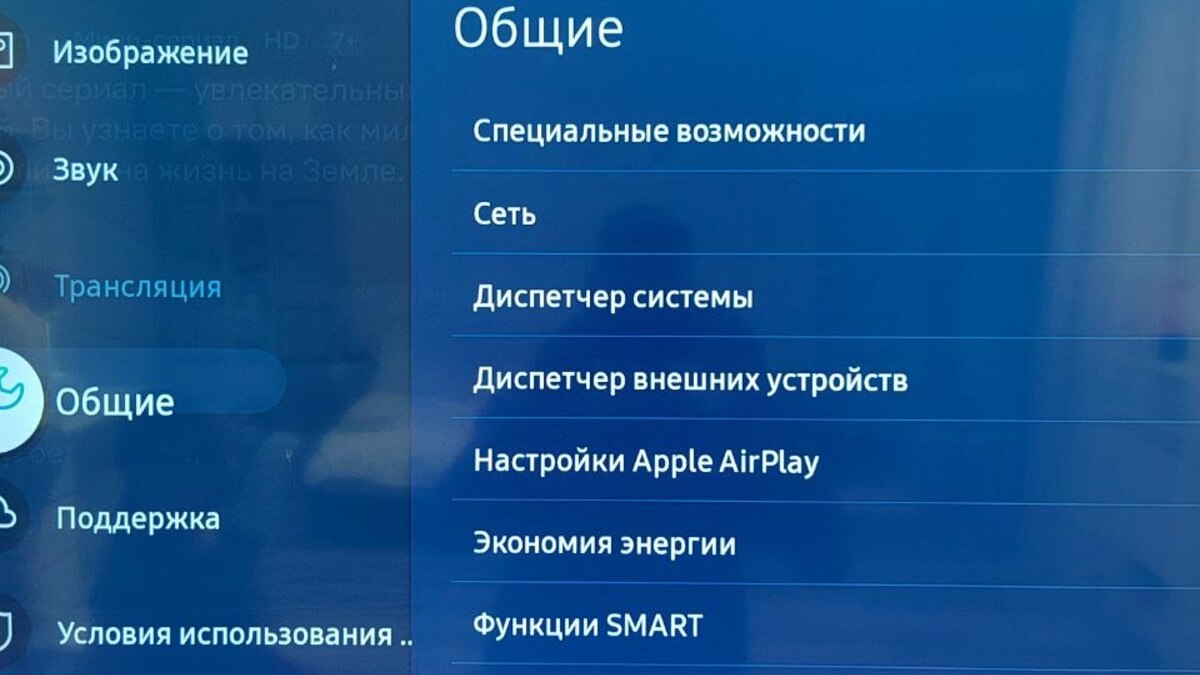
Step 7. Setting up Samsung Smart TV
Instructions for Samsung on WebOS. On the TV open Settings → General → Network:
Select "Open Network Settings":
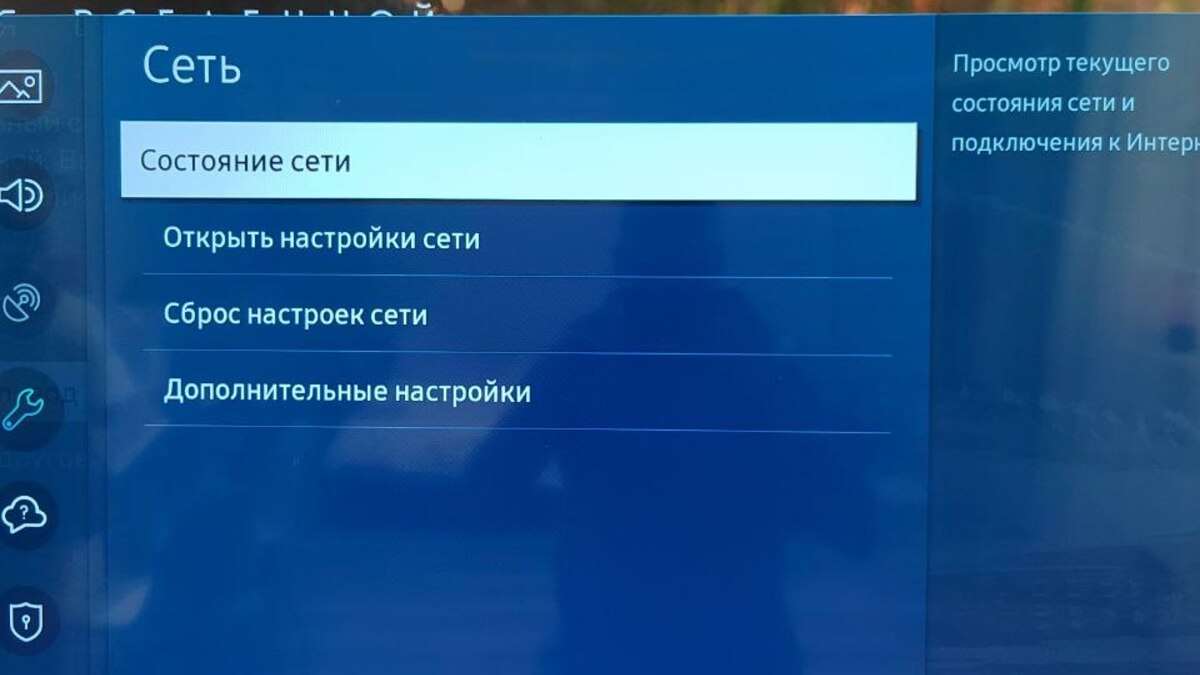
Click "IP Settings" in the bottom menu:
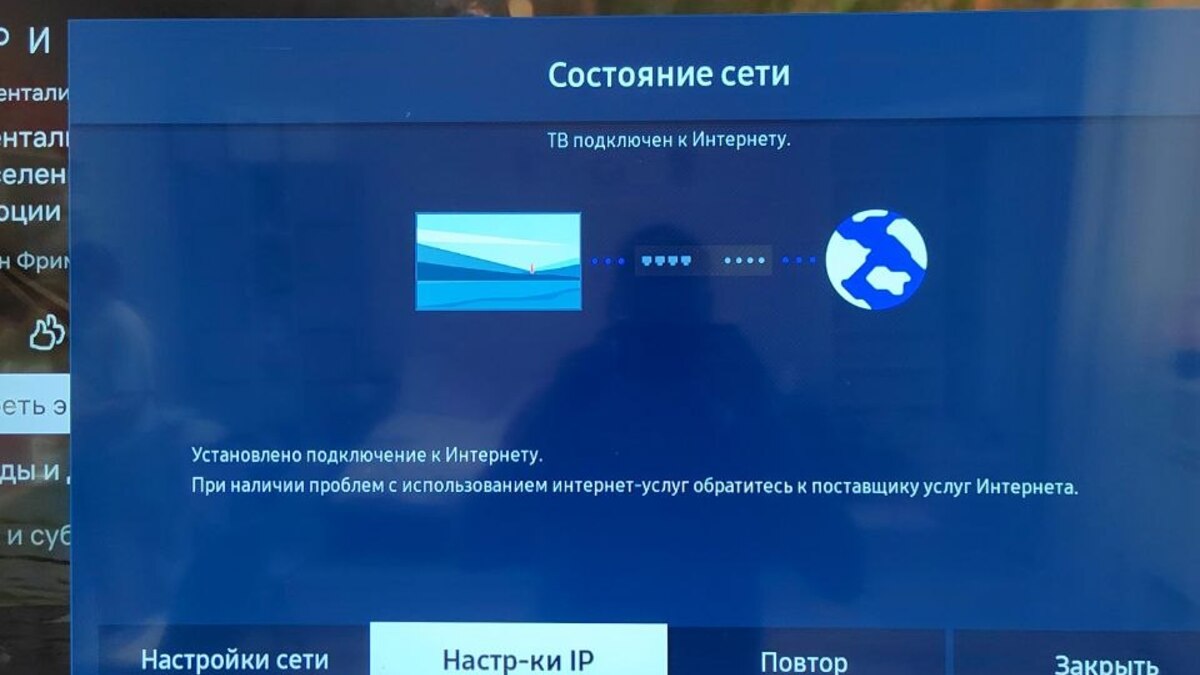
Find the "DNS Settings" section, switch to "Enter manually" and enter your VPS IP:
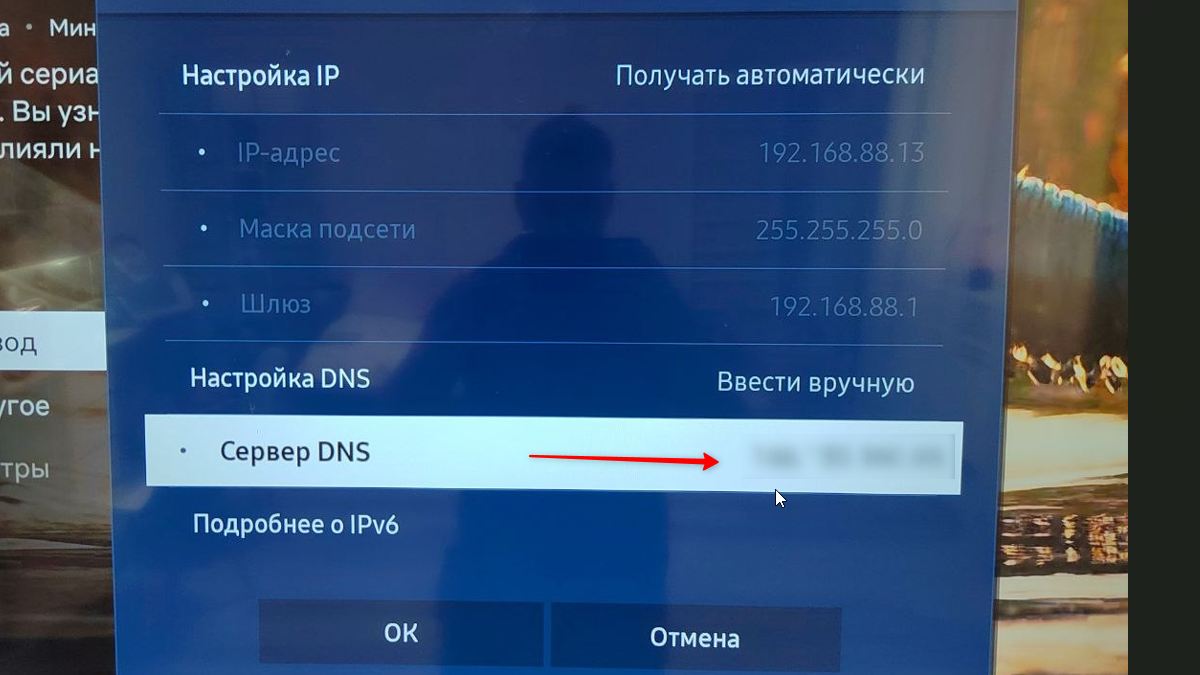
Click OK and restart the Netflix app. After that the service will detect the Kazakhstani IP and open the full catalog.
How to set DNS on other devices
The method is the same for all devices — find the network settings section and replace the DNS server with your VPS IP:
- Android phone — Settings → Wi-Fi → long press network → Modify → Advanced → IP settings: Static → DNS 1: your IP
- iPhone / iPad — Settings → Wi-Fi → (i) next to network → Configure DNS → Manual → add server IP
- Windows PC — Settings → Network → adapter properties → DNS server: your IP
- Router — the most convenient option: set the IP once in router settings, and SmartDNS works on all home devices at once
Part 2: Paying for Netflix with a virtual card from mirocard.com
After setting up SmartDNS, Netflix will become accessible, but to subscribe you need a foreign card — Russian cards are not accepted. We will use a virtual Mastercard from mirocard.com: it is a Singapore card that can be topped up in dollars and used to pay for Netflix and other international services.
Card cost: $10.00 to issue + 4% commission on top-ups. Top-ups are only possible with cryptocurrency (USDT, BTC, and others). If you don't have crypto — no problem, you can buy it through fkwallet.com, which accepts rubles via SBP (Fast Payment System) and bank cards.
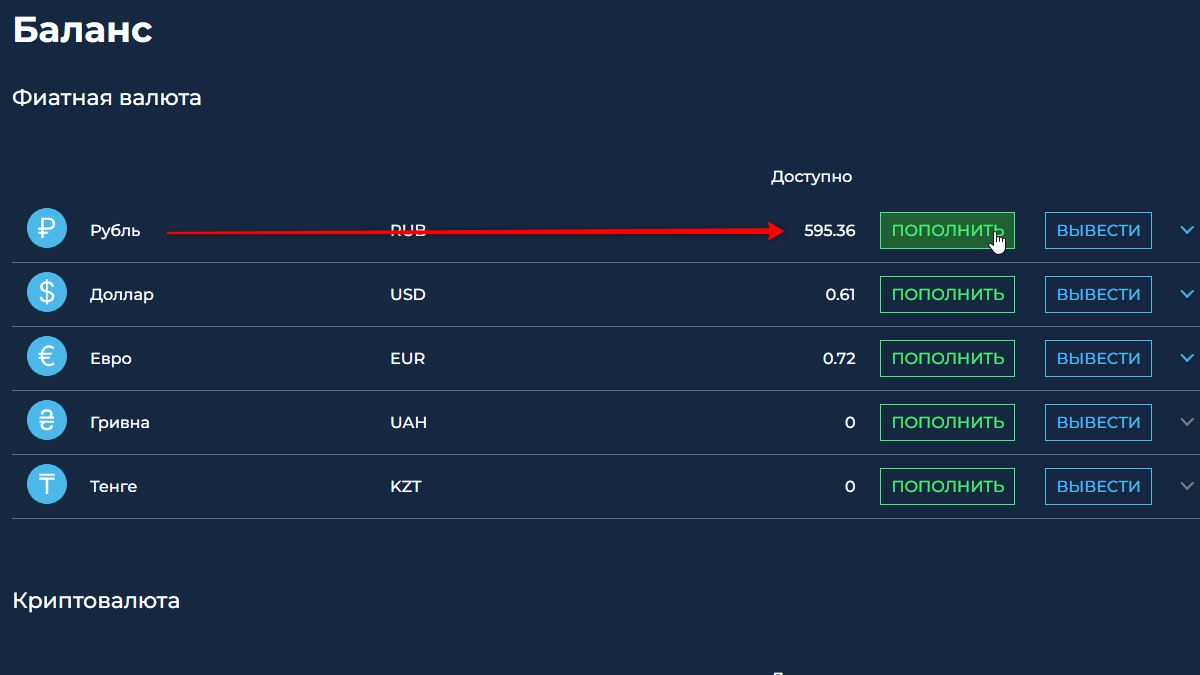
Step 1. Topping up your FKWallet balance with rubles
Register at fkwallet.com. After logging in, go to the "Wallet" section and top up your ruble balance using a convenient method: SBP, bank card, Qiwi, and others:
Step 2. Exchanging rubles for USDT
After topping up, go to the "Currency Exchange" section. Enter the amount in rubles (e.g. 500 ₽), select USDT as the target currency, and click "Exchange":
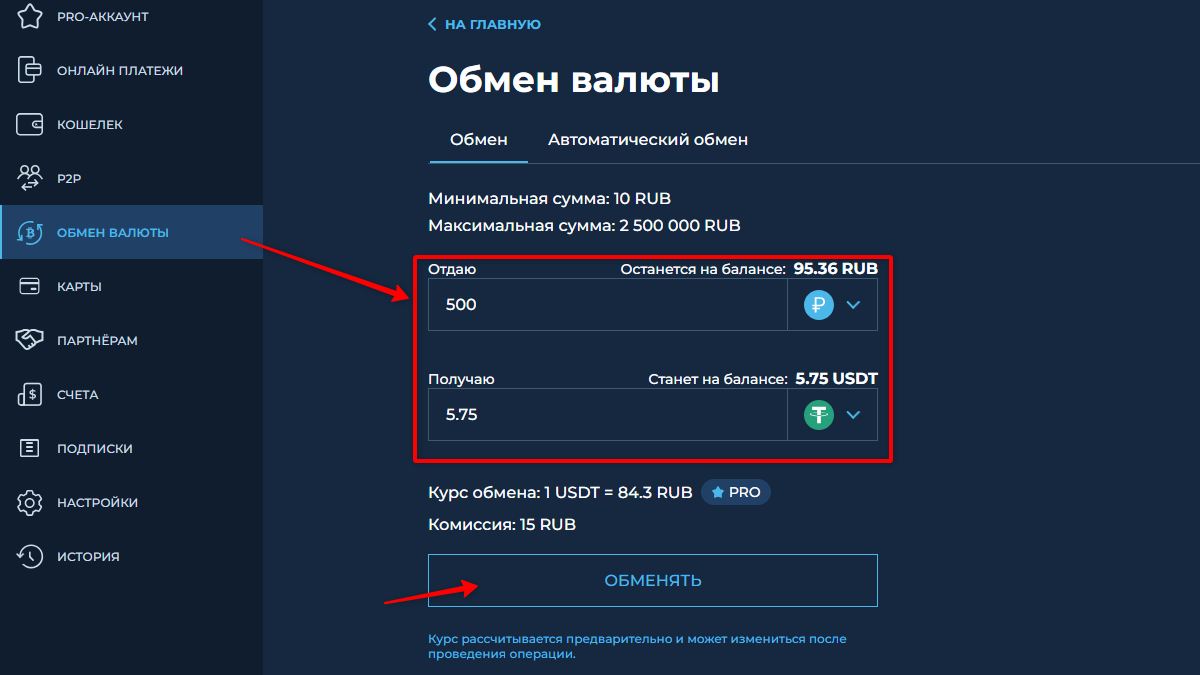
The rate is current at the time of exchange. Minimum amount — 10 ₽, exchange fee — fixed 15 ₽.
Step 3. Sending USDT to mirocard.com
After the exchange, USDT will appear in the "Wallet → Cryptocurrency" section. Click "Withdraw" next to USDT:
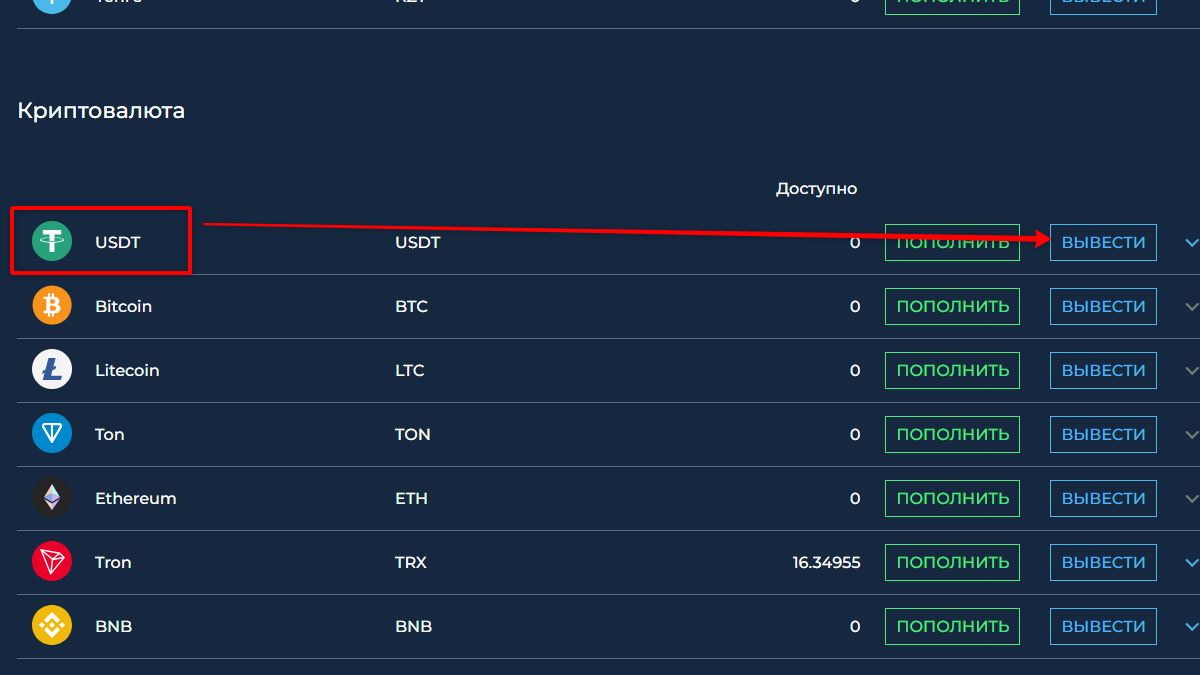
Select the TRC20 network (0% fee + 3 USDT) and paste the USDT address from mirocard.com. Where to get the address — see the next step:

Step 4. Getting your USDT address on mirocard.com
Register at mirocard.com. On the main page click "Top Up". In the panel that opens, select the USDT coin and the Tron (TRC20) network. You will receive a deposit address:
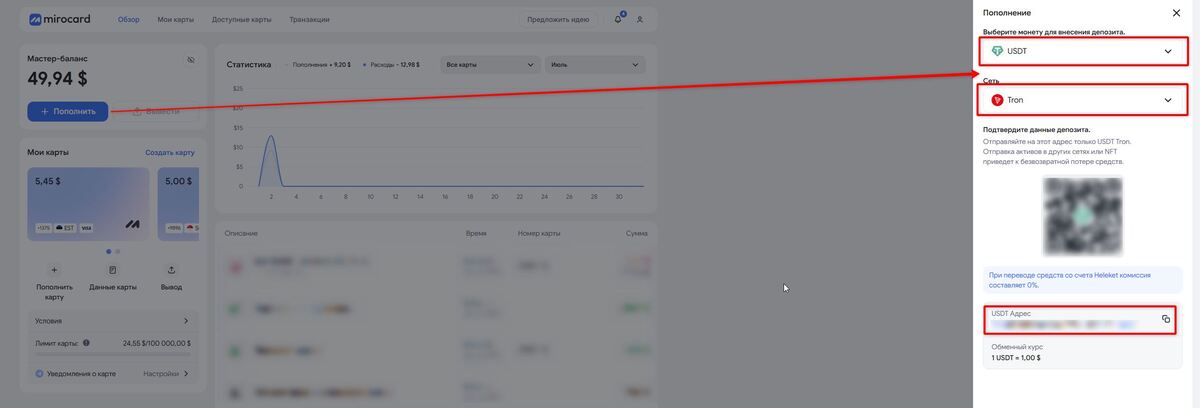
Copy the USDT address and paste it into the FKWallet withdrawal form (step above). Minimum top-up — 1 USDT. Funds arrive within 5–15 minutes.
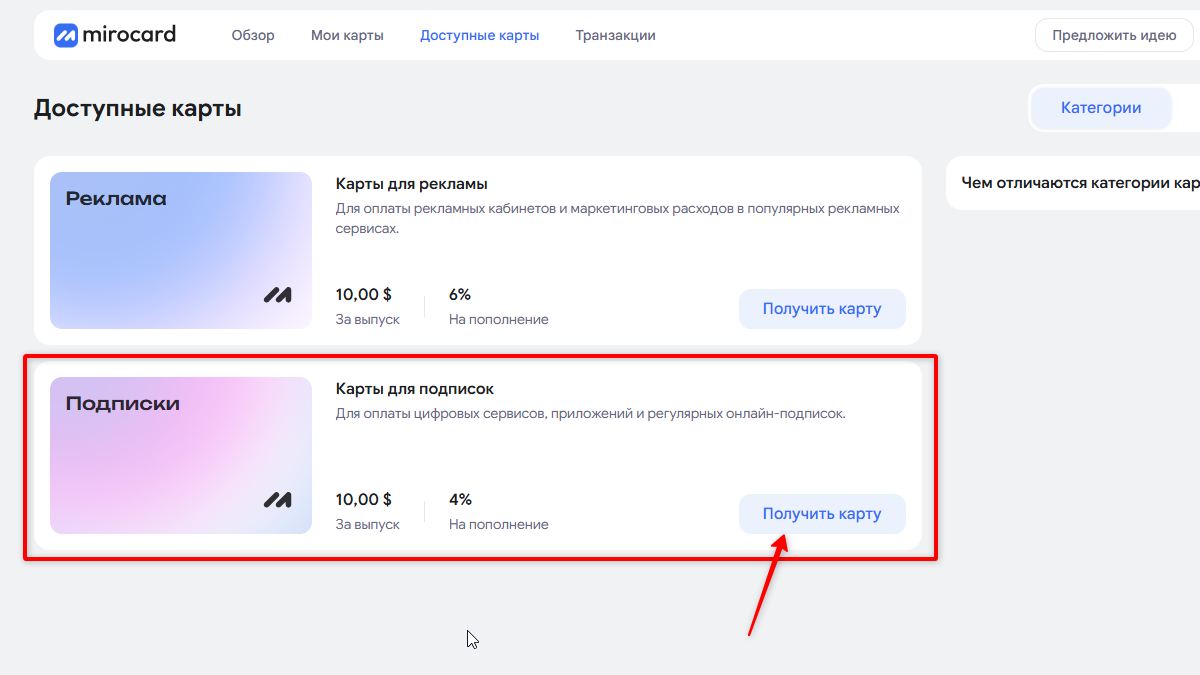
Step 5. Issuing a card for subscriptions
After topping up your balance, go to the "Available Cards" section. Select the "Subscription Cards" category — this is the type designed for Netflix, Spotify, and other streaming services. Issue fee — $10.00, top-up commission — 4%:
Click "Get Card". Select the country SGP (Singapore) — it works well with Netflix. Basic KYC verification is required (name, document upload). After completing verification, specify the initial balance and pay:
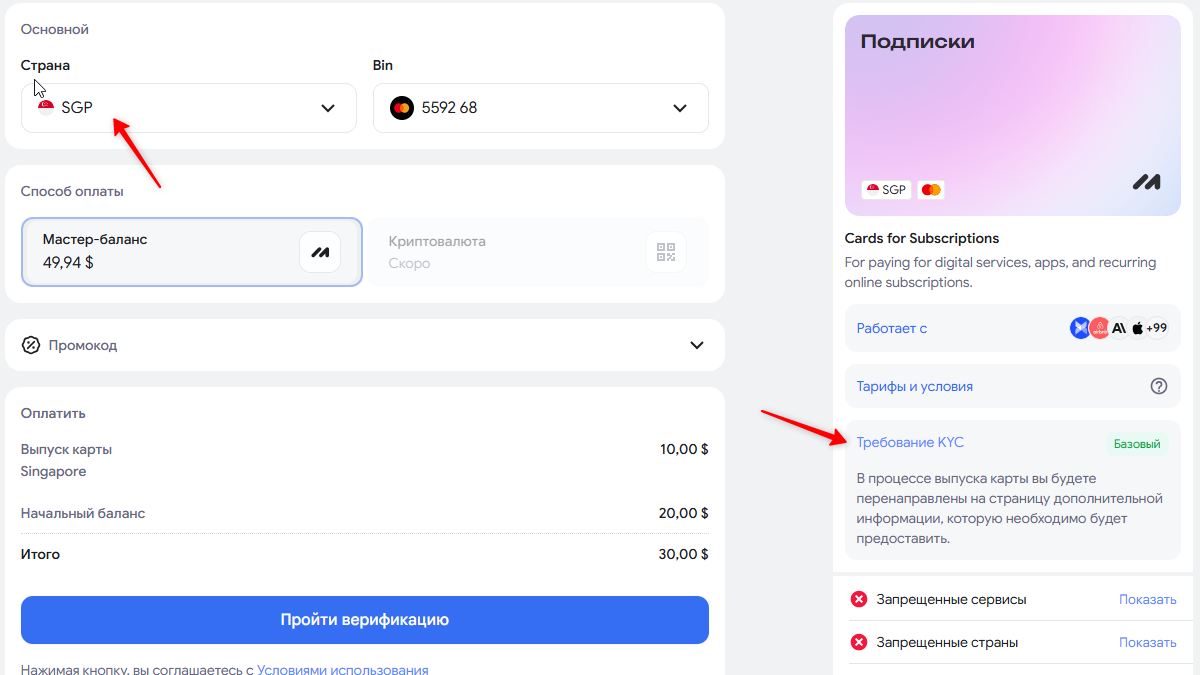
Total cost when ordering with an initial balance of $20: issue fee $10 + $20 = $30. The card is ready to use immediately after payment.
Step 6. Paying for a Netflix subscription
Go to the Netflix website, select a plan, and enter the mirocard card details. The transaction looks like this — NETFLIX INTERNATIONAL Amsterdam NLD, charged in euros at the Mastercard exchange rate:
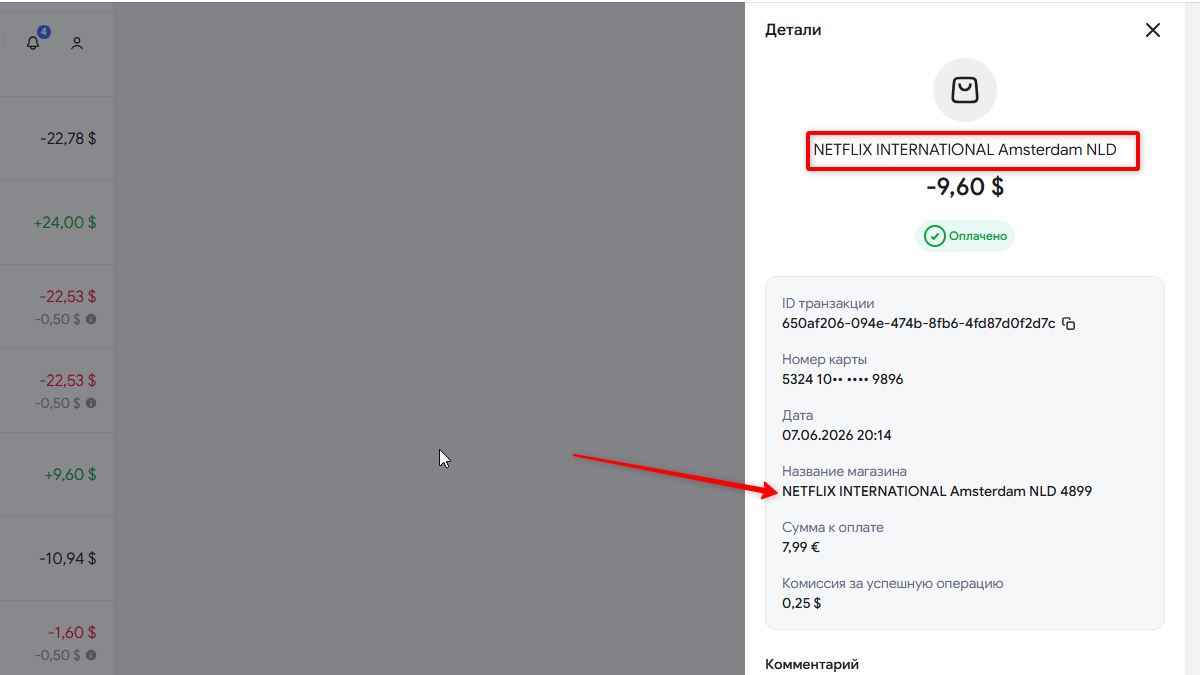
A Netflix subscription in the Netherlands region is cheaper than in many other countries. The standard plan costs around €7.99 per month.
Summary
The complete setup works like this:
- Purchase a VPS on gohost.kz (~$8/month)
- Configure SmartDNS following the instructions above — 30 minutes
- Set the server IP as DNS on all your home devices
- Top up FKWallet with rubles via SBP, exchange to USDT
- Transfer USDT to mirocard.com, issue a Singapore card ($10)
- Pay for a Netflix subscription — ~€7.99/month
Total costs in the first month: ~$8 (VPS) + ~$10 (card issuance) + ~$9 (Netflix) ≈ $27. From the second month onward — only VPS and Netflix, around $17/month.