
A mobile proxy from a phone is a way to get a real mobile carrier IP for tasks where datacenter addresses won't work: scraping, multi-accounting, bypassing anti-fraud systems. In this article you'll learn how to create a mobile proxy from an Android phone on your own — from renting a VPS to verifying your working proxy.
What is a mobile proxy from a phone and why do you need one
A mobile proxy is a proxy server that provides a mobile carrier IP address. Unlike server proxies (where the IP belongs to a hosting provider), a mobile IP belongs to a carrier — MTS, Beeline, MegaFon, Tele2. Websites and anti-fraud systems treat this traffic as an ordinary mobile user.
How a DIY mobile proxy works:
- An Android phone with a SIM card connects to the internet via a mobile network (3G/4G/LTE)
- The phone establishes a VPN connection to a VPS server
- A SOCKS5 proxy app runs on the phone
- The VPS accepts incoming connections from clients and routes them through the VPN tunnel to the phone
- The phone sends requests to the internet via the mobile network — with a real mobile IP
Result: an external user connects to the VPS as if it were a regular proxy server, while all traffic exits to the internet through the phone's mobile IP.
Who this DIY mobile proxy is suitable for
- Testing and experimentation — try out how a mobile IP works before purchasing a commercial solution
- Personal use — one or two accounts, low request volume
- Learning — understand VPN tunneling technology, iptables, and how SOCKS5 works
Who it is not suitable for
- High loads — thousands of requests per hour will overload a single phone
- Commercial scraping — requires stability, SLA, and automatic IP rotation
- Multi-accounting at scale — requires multiple carriers and regions simultaneously
- Working with antidetect browsers — requires guaranteed uptime and an IP-change API
What you need to create a proxy from a phone
Prepare everything you need before you start. The whole process takes 30–60 minutes.
- Android phone with a SIM card — Android 5.0 or higher. Any phone will do, even an old smartphone. The SIM card must have an active mobile data plan. Important: WiFi must be disabled during operation — traffic must go only through the mobile network
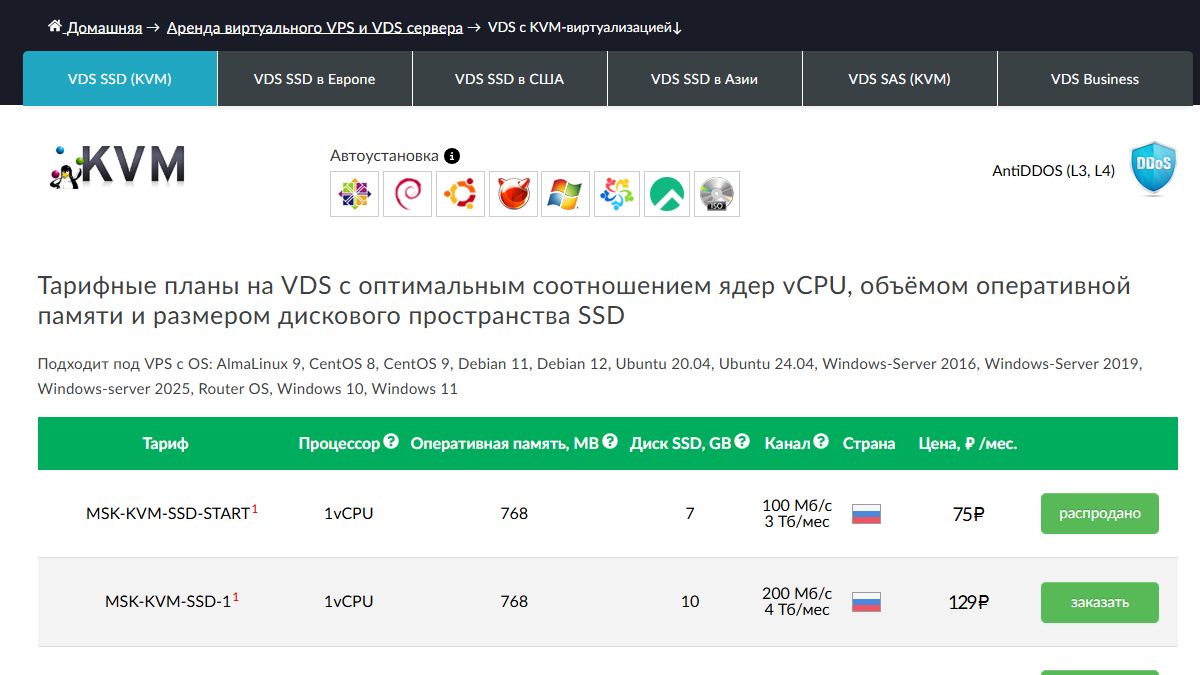
- VPS server — Ubuntu 20.04/22.04 or Debian 10/11/12. Minimum 512 MB RAM, 1 CPU core, 5 GB disk. The VPS needs a public (white) IP address. We recommend FirstByte — a Russian hosting provider with NVMe drives, plans from 129 RUB/month, IP assigned immediately after payment. The MSK-KVM-SSD-1 plan is sufficient to connect 10 or more phones.
- SSH client on your computer — for connecting to the VPS. On Linux/macOS — the built-in terminal; on Windows — PuTTY or Windows Terminal
- OpenVPN Connect — a free app from Google Play to connect the phone to the VPS via VPN
- Every Proxy — a free app from Google Play that runs a SOCKS5/HTTP proxy on the phone without root access. An alternative is Socks Server Ultimate (paid, more flexible)
Where to get a VPS: for this guide we used FirstByte — one of the few hosting providers where a server is up in 30 seconds and payment is accepted via Russian cards. Register via the link, choose the MSK-KVM-SSD-1 plan (129 RUB/month) — more than enough to run OpenVPN and serve several phones at the same time.
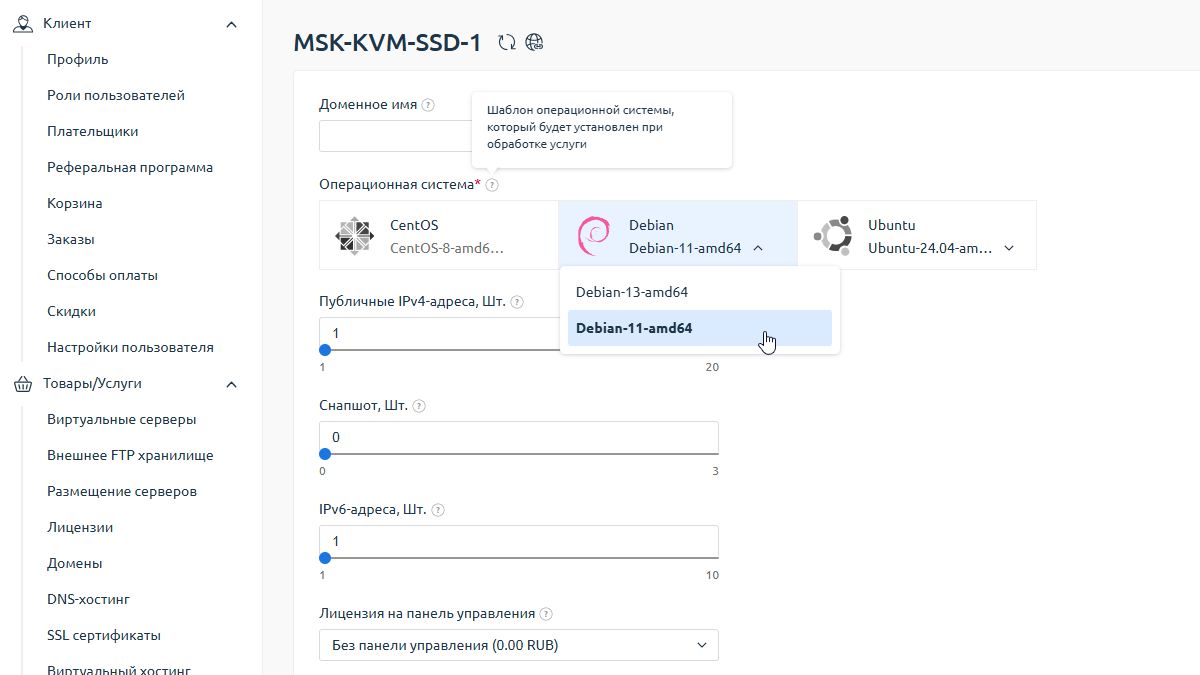
When ordering, select the OS Debian 11 amd64 — this guide has been tested on it.
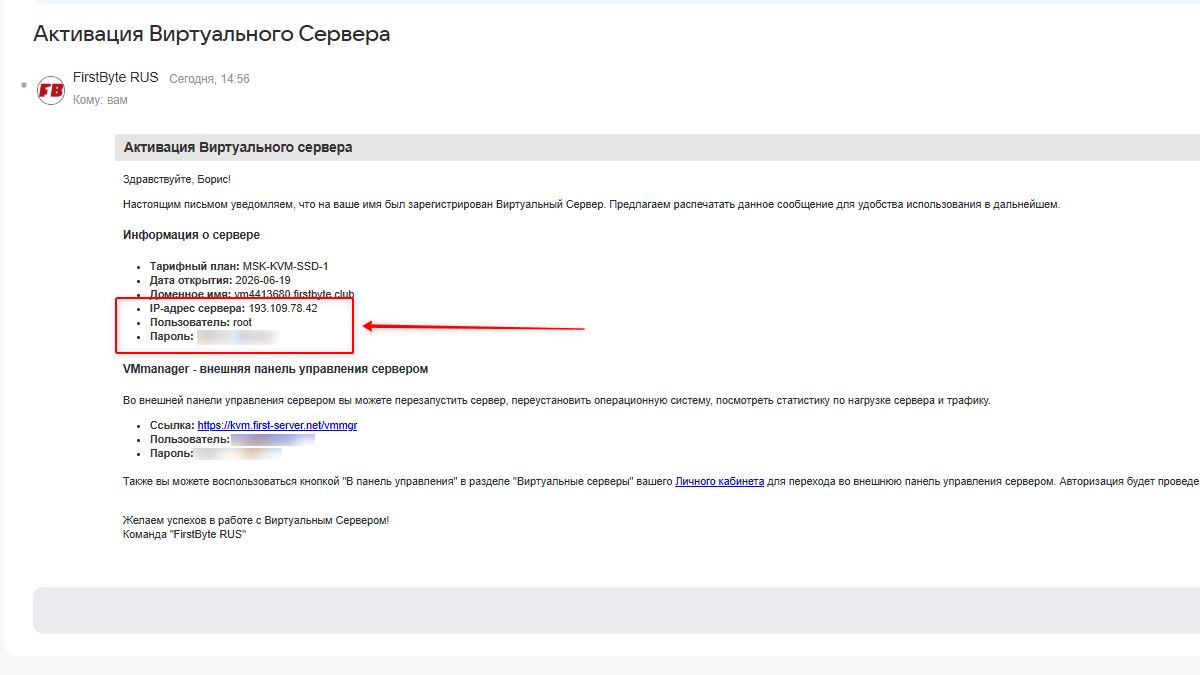
After payment, you will receive an email with the connection details: server IP address, username, and password.
Step 1. Installing an OpenVPN server on the VPS
Connect to the VPS via SSH. On Windows, use PuTTY: enter the server IP address from the email, port 22, and click Open.
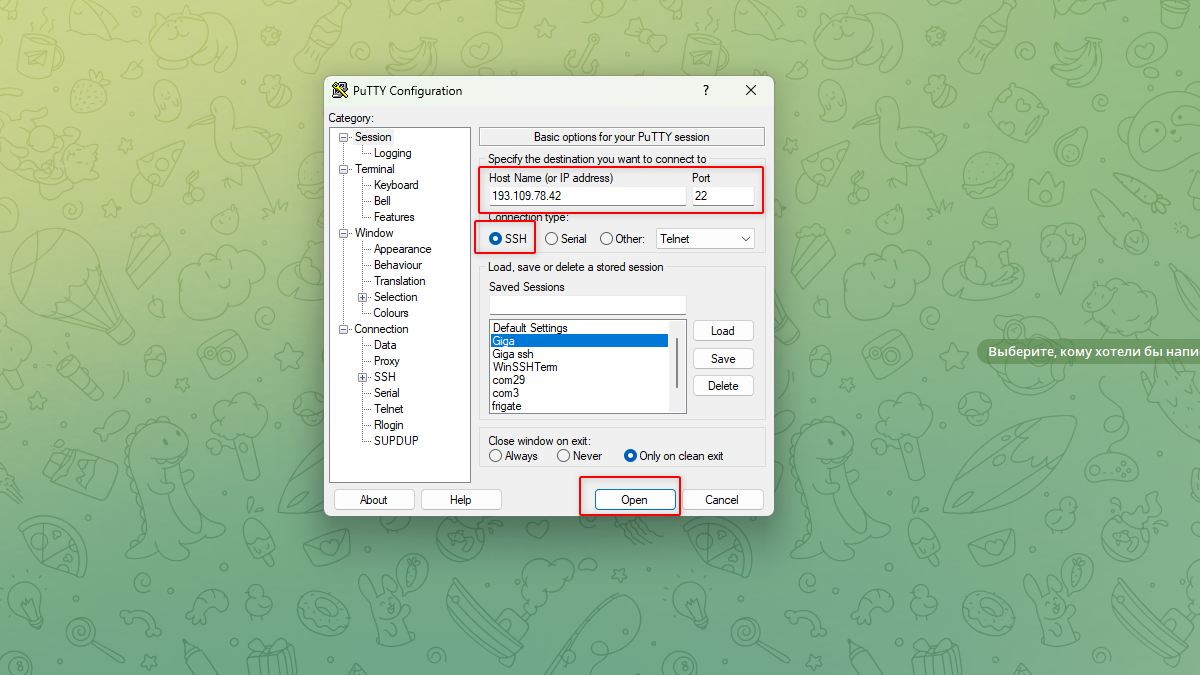
Enter the login root and press Enter. Then paste the password with the right mouse button (in PuTTY the password characters are not shown — this is normal) and press Enter.
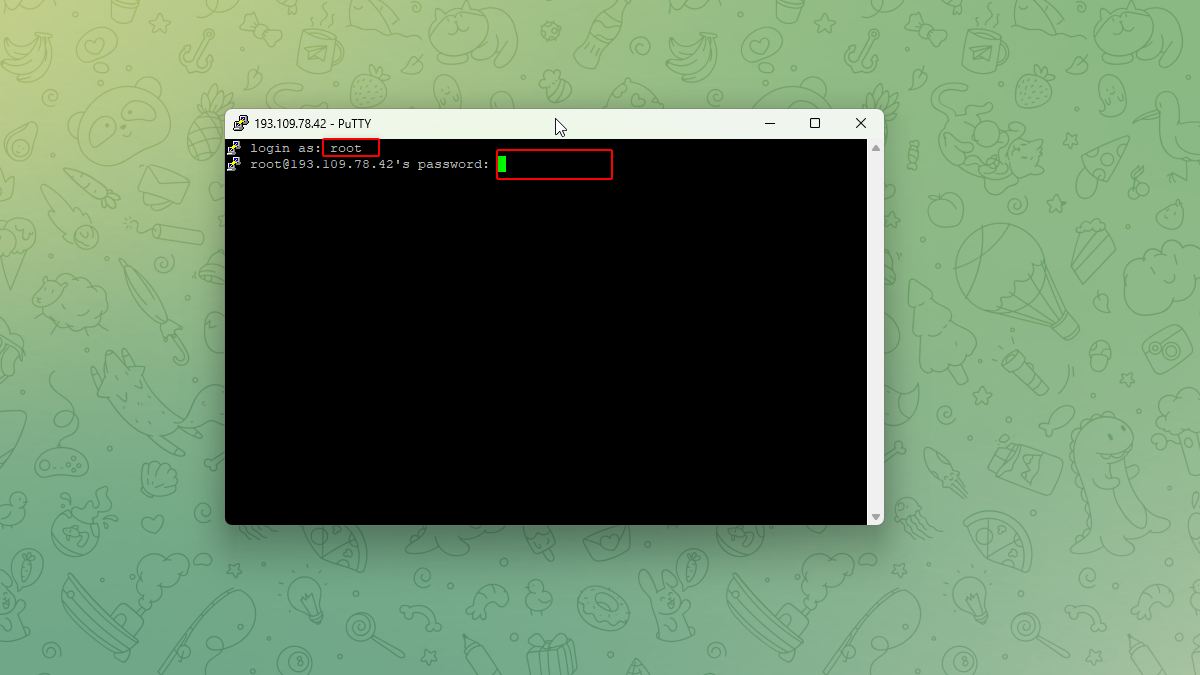
After logging in you will see the command prompt. We will use the ready-made script openvpn-install by Nyr — the simplest and most reliable way to deploy an OpenVPN server in a couple of minutes.
wget https://raw.githubusercontent.com/Nyr/openvpn-install/master/openvpn-install.sh
chmod +x openvpn-install.sh
bash openvpn-install.sh
The script will ask a few questions:
- Which protocol? — select 1 (UDP). UDP is faster than TCP
- What port? — leave the default (1194) if the port is not in use
- Select a DNS server — select 1 (Current system resolvers) or 3 (Google). For a proxy this is not critical
- Enter a name for the first client — enter a name, for example: android1
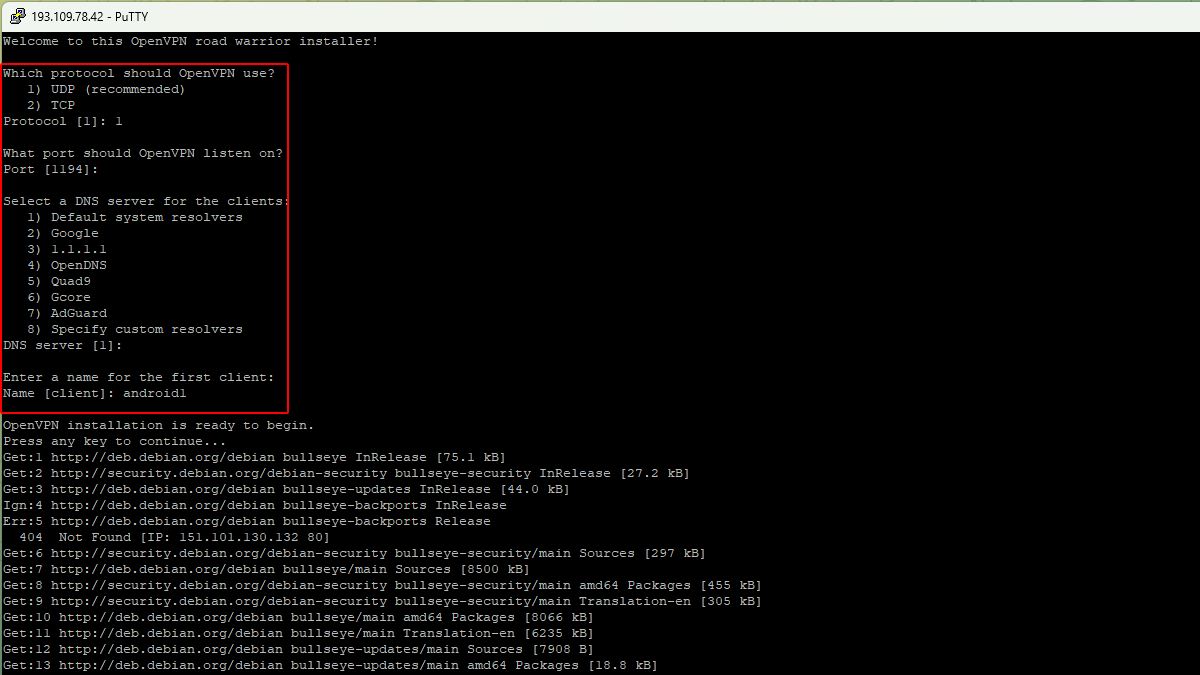
Wait for the installation to complete. Afterwards, the file android1.ovpn will appear in the /root/ directory — this is the connection profile for the phone.
Important after installation: by default the script adds the line push "redirect-gateway def1 bypass-dhcp" to the config, which routes all of the phone's internet traffic back through the VPN tunnel to the VPS. As a result, Every Proxy requests exit to the internet with the server's IP, not the mobile carrier's. You need to disable this option:
nano /etc/openvpn/server/server.confFind the line and comment it out:
#push "redirect-gateway def1 bypass-dhcp"Save the file (Ctrl+O, Enter, Ctrl+X) and restart OpenVPN:
systemctl restart openvpn-server@serverThen copy the profile file to your computer. On Windows, open the command prompt (cmd) and run:
scp root@YOUR_VPS_IP:/root/android1.ovpn C:Users%USERNAME%Downloads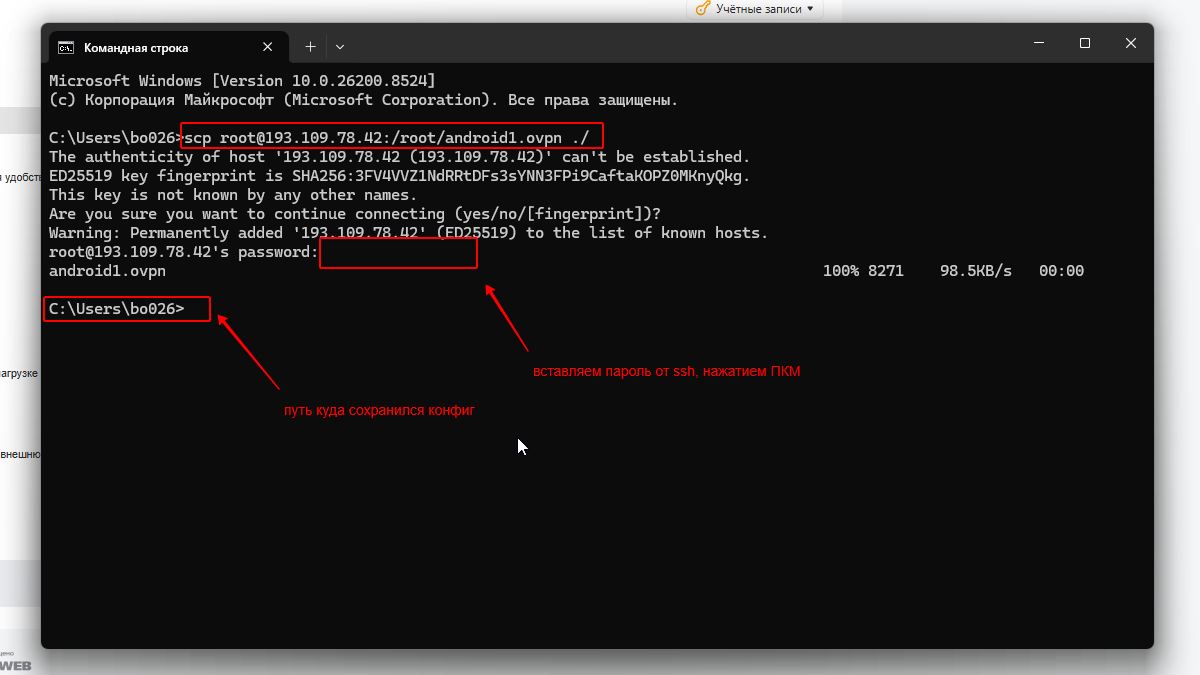
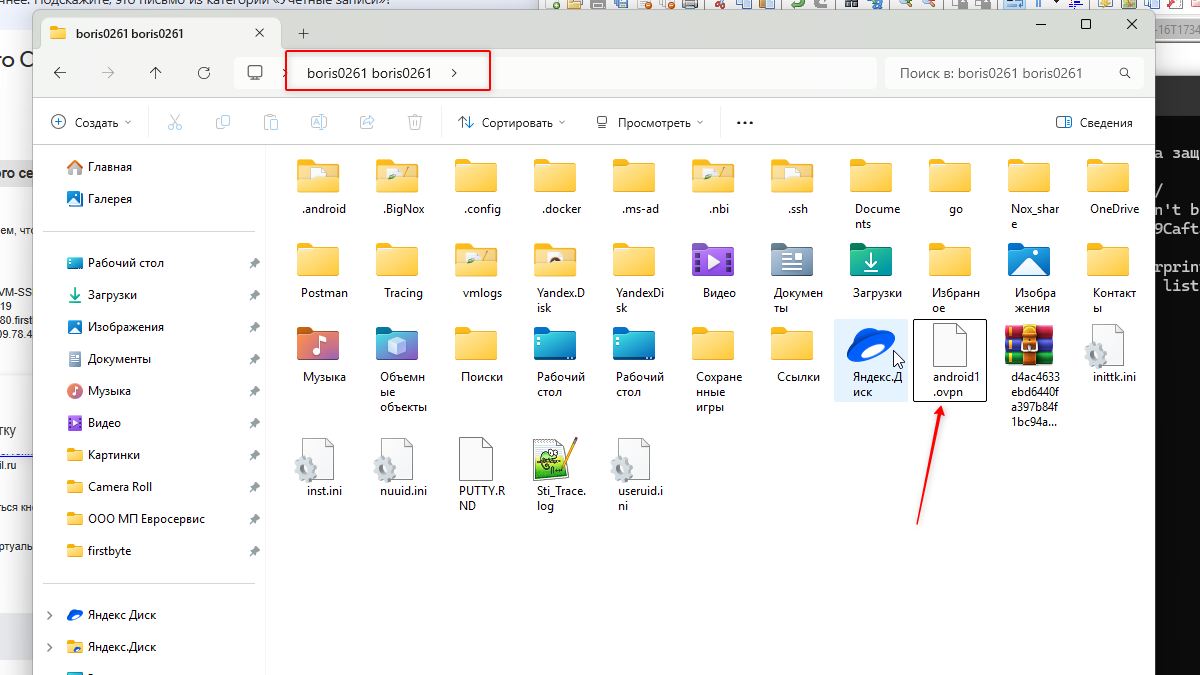
Replace YOUR_VPS_IP with the actual IP of your VPS server.
If you need an additional client
Run the script again:
bash openvpn-install.shSelect Add a new client and enter a name (for example, android2). The new profile file will appear in /root/.
Step 2. Enabling IP forwarding on the VPS
IP forwarding allows the server to pass packets between network interfaces — this is required to redirect traffic from the external IP to the VPN tunnel to the phone.
Check the current value:
sysctl net.ipv4.ip_forwardIf the output shows net.ipv4.ip_forward = 0 — forwarding is disabled. Enable it:
echo "net.ipv4.ip_forward=1" >> /etc/sysctl.conf
sysctl -p
Checking again should return:
net.ipv4.ip_forward = 1Note: the openvpn-install script usually enables forwarding automatically. But it is better to verify — without it the proxy will not work.
Step 3. Configuring the Android phone
Installing OpenVPN Connect and connecting to the VPS
- Install OpenVPN Connect from Google Play
- Transfer the file
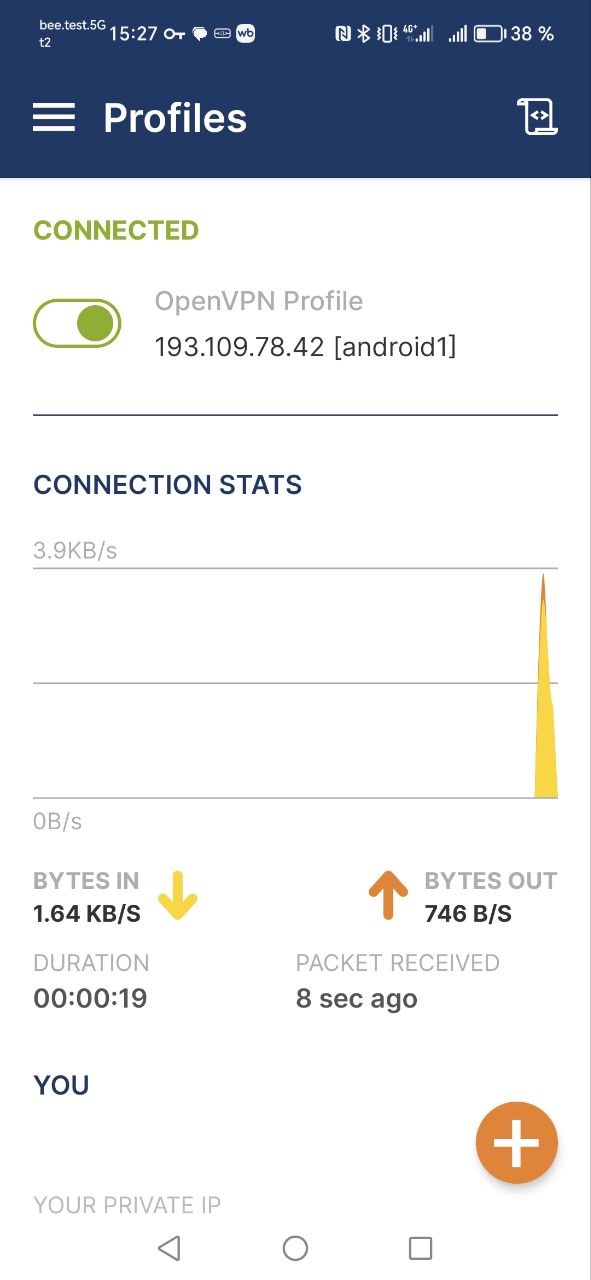
android1.ovpnto the phone — via Telegram (send it to yourself in Saved Messages), by email, or via USB cable - Open OpenVPN Connect, tap Import (or the "+" icon), and select the downloaded
.ovpnfile
- Disable WiFi on the phone — only mobile data (3G/4G/LTE) should be active. This is key: if WiFi is on, traffic will go through your home internet instead of through the mobile IP
- Tap Connect. On the first connection Android will ask for permission to create a VPN connection — confirm it
- After a successful connection, a key icon (VPN) will appear in the status bar, and the app will show the status Connected
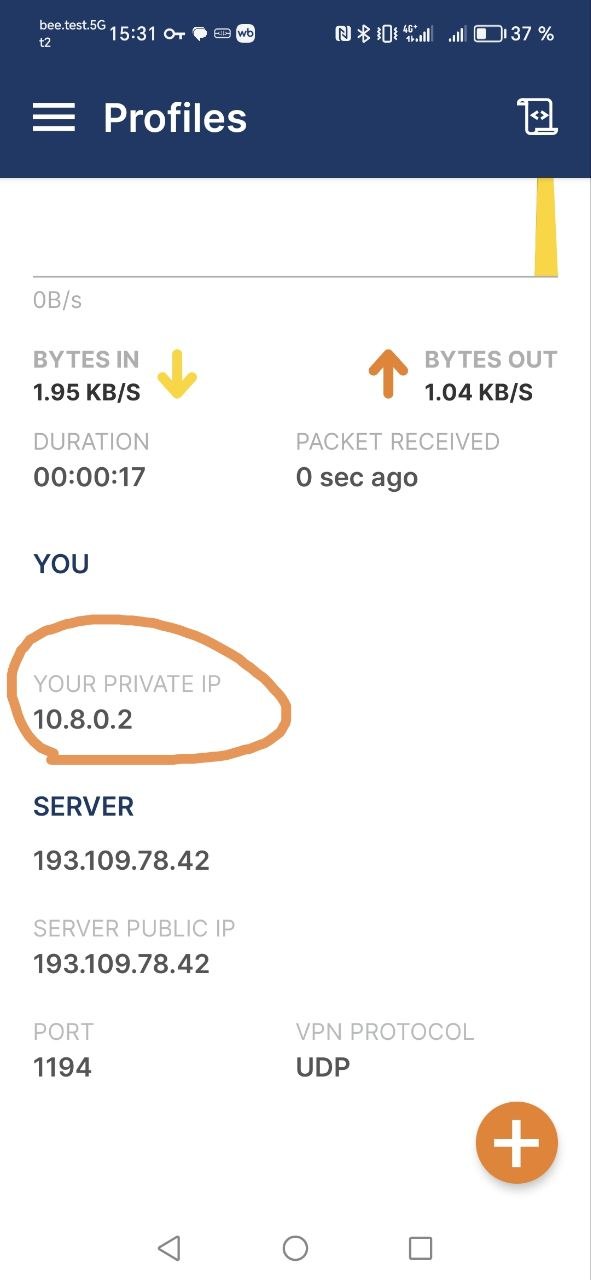
Note the VPN address of the phone — you will need it in step 4. It is usually 10.8.0.2 (first client). You can see it in OpenVPN Connect: tap the active connection and look for a line like IPs: 10.8.0.2.
Starting the SOCKS5 proxy on the phone (Every Proxy)
- Install Every Proxy from Google Play
- Open the app. On the main screen, select SOCKS Proxy
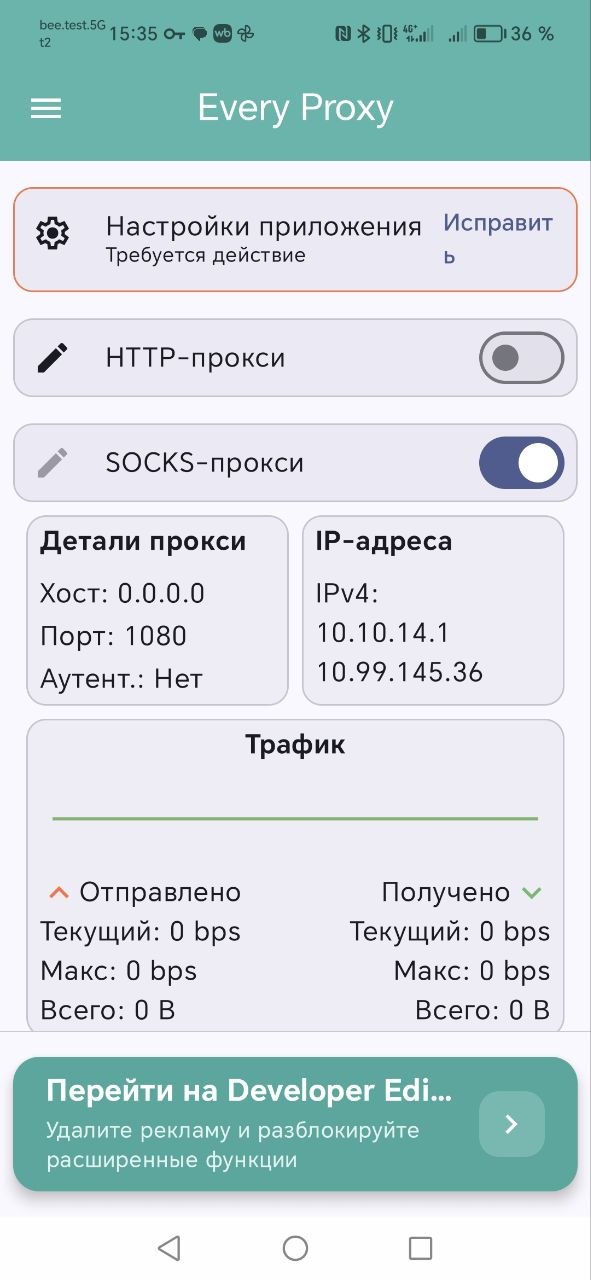
- Set a port — for example,
8080. You can choose any port from 1024 to 65535; just remember it - Enable authentication: go to Settings → Auth (or the gear icon) and set a username and password. Without authentication, anyone who knows the IP and port can use your proxy
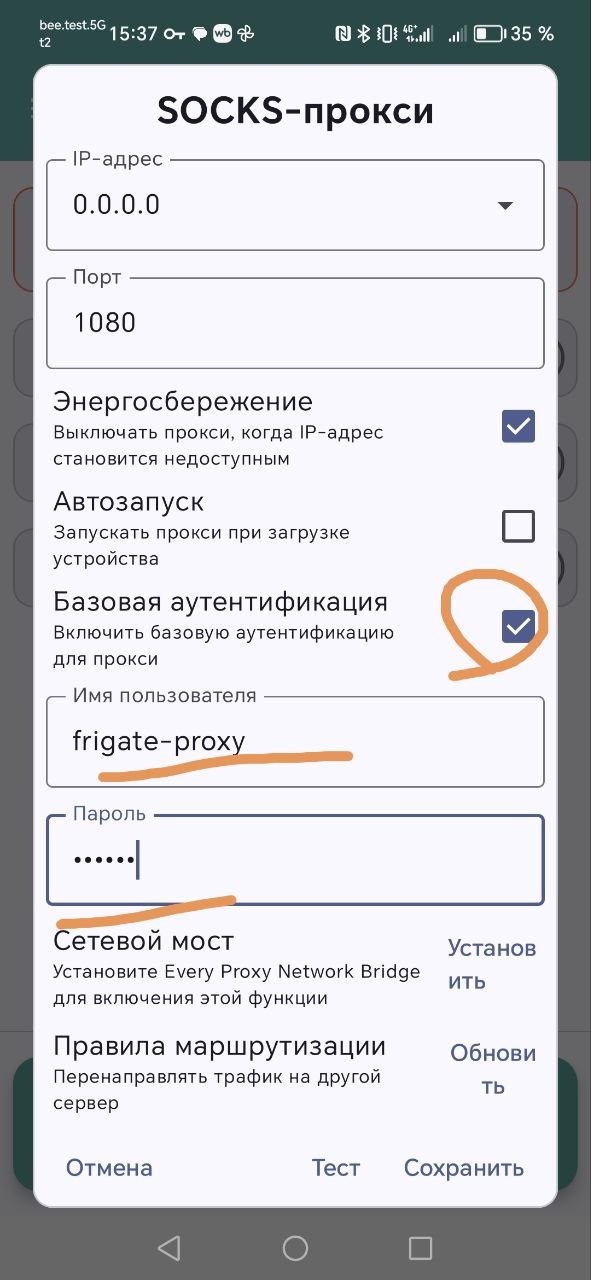
- Tap Start — the proxy server is running. The phone now listens on port 8080 on all interfaces, including VPN
Alternative to Every Proxy: the app Socks Server Ultimate (formerly Socks Server Pro). It is paid but offers more options: choosing the proxy type (SOCKS4/SOCKS5/HTTP), binding to a specific interface, and logging connections. The setup process is similar.
Step 4. Port forwarding on the VPS (iptables)
The proxy server is now running on the phone, but it can only be reached from within the VPN network (at address 10.8.0.2:8080). To make the proxy accessible from the internet, you need to configure port forwarding on the VPS: incoming connections to the server's external IP will be redirected to the phone's VPN address.
Run two iptables commands on the VPS:
# DNAT — redirect incoming packets from the external IP to the phone via VPN
iptables -t nat -A PREROUTING -d VPS_IP -p tcp --dport PORT -j DNAT --to-destination PHONE_VPN_IP:PORT

# SNAT — masquerade the source address so the phone's reply returns via the VPS
iptables -t nat -A POSTROUTING -d PHONE_VPN_IP -p tcp --dport PORT -j SNAT --to-source 10.8.0.1
Replace the variables:
VPS_IP— the public (white) IP of your VPS serverPHONE_VPN_IP— the VPN address of the phone obtained in step 3 (usually10.8.0.2)PORT— the proxy port from Every Proxy (for example,8080)
Example with specific values
Suppose your VPS IP is 185.204.0.9, the phone's VPN address is 10.8.0.2, and the proxy port is 8080:
iptables -t nat -A PREROUTING -d 185.204.0.9 -p tcp --dport 8080 -j DNAT --to-destination 10.8.0.2:8080
iptables -t nat -A POSTROUTING -d 10.8.0.2 -p tcp --dport 8080 -j SNAT --to-source 10.8.0.1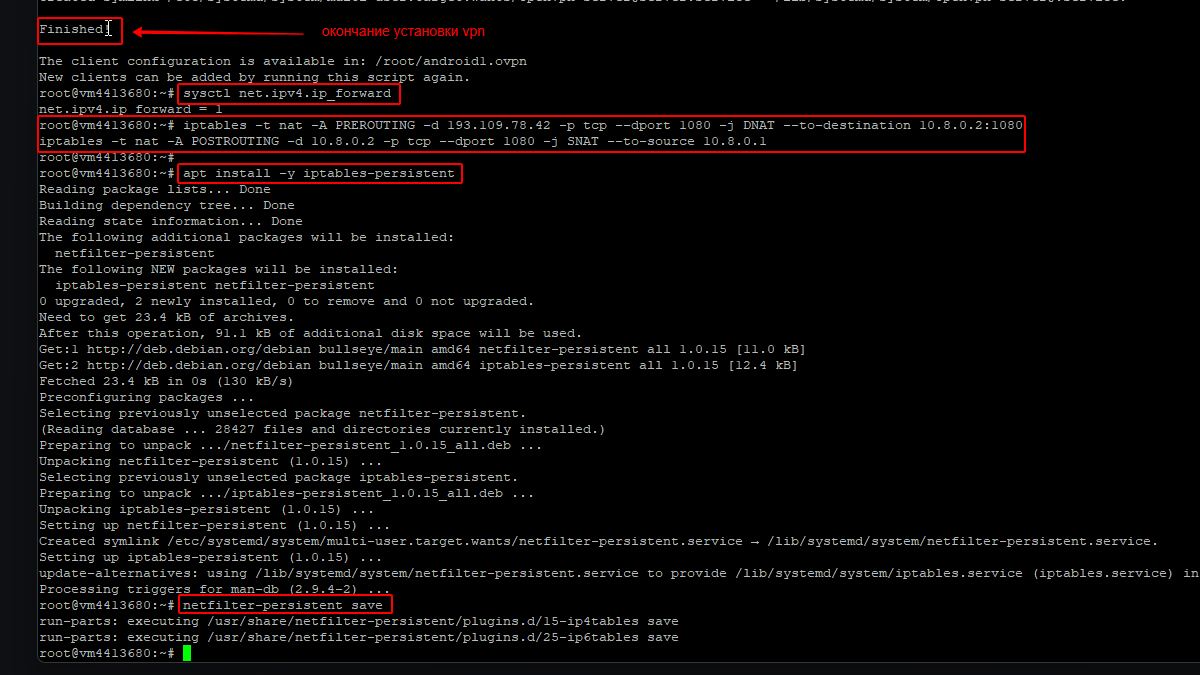
How it works
The first rule (PREROUTING/DNAT) intercepts all TCP packets arriving at 185.204.0.9:8080 and changes the destination address to 10.8.0.2:8080 — that is, to the phone via the VPN tunnel.
The second rule (POSTROUTING/SNAT) replaces the source address with 10.8.0.1 (the VPS's VPN address). Without it, the phone would try to send the reply directly to the client, bypassing the VPN, and the connection would not be established.
Saving iptables rules
By default, iptables rules are reset when the server reboots. To make them persistent:
apt install -y iptables-persistent
netfilter-persistent save
When installing iptables-persistent, the system will ask whether to save the current IPv4 and IPv6 rules — answer Yes to both questions.
Step 5. Testing the proxy
The proxy is configured. Now let's verify that it works and provides a mobile IP. Open the cmd command prompt on Windows and run:
curl -x socks5://LOGIN:PASSWORD@VPS_IP:8080 https://ipinfo.ioReplace LOGIN and PASSWORD with the credentials from Every Proxy, and VPS_IP with the external IP of your server. In the response, the org field should show the name of the mobile carrier: MTS, Beeline, MegaFon, T2 Mobile (Tele2), etc.
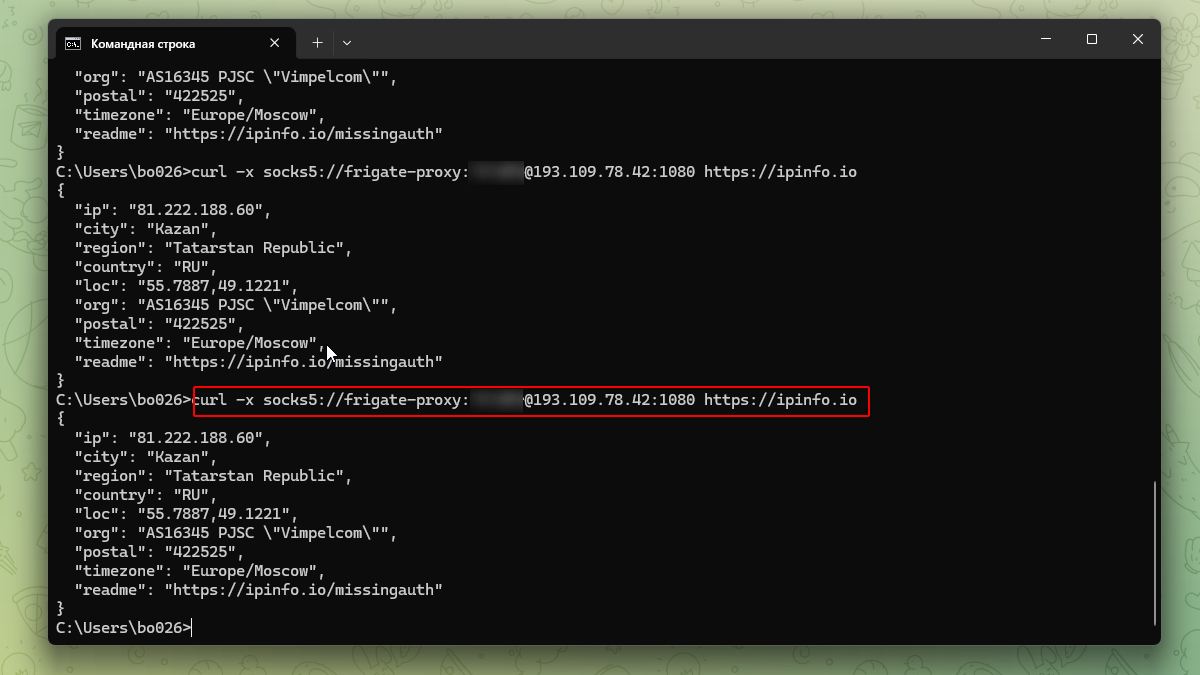
If the org field shows a mobile carrier rather than the name of a hosting provider — the proxy is working correctly.
What to do if the proxy does not work
- Connection refused — check that Every Proxy is running on the phone (status: Started), the VPN is connected, and the port in iptables matches the port in the app
- Timeout — check that the VPS firewall is not blocking the selected port. Run
ufw allow 8080/tcp(if using UFW) oriptables -A INPUT -p tcp --dport 8080 -j ACCEPT - Returns the VPS IP instead of a mobile IP — two possible causes. First: WiFi is enabled on the phone and traffic is going through your home internet — disable WiFi. Second (most common): the
redirect-gatewayoption is active in the OpenVPN config, routing all the phone's traffic back through the VPS. Open/etc/openvpn/server/server.conf, comment out the linepush "redirect-gateway def1 bypass-dhcp"(add#at the beginning), and runsystemctl restart openvpn-server@server. Then reconnect in OpenVPN Connect. - Authentication error (407) — incorrect username or password. Check the Auth settings in Every Proxy
Changing the IP (rotation) manually
The mobile carrier assigns a new IP when you reconnect to the network. The simplest way to change the IP:
- Enable airplane mode on the phone (swipe down → airplane icon)
- Wait 5–10 seconds
- Disable airplane mode
- Wait for the phone to reconnect to the mobile network
- Reconnect to the VPN in OpenVPN Connect (sometimes the VPN reconnects automatically)
- Make sure Every Proxy is still running
Pros and cons of a DIY mobile proxy
Pros
- Real mobile IP — not detected by anti-fraud systems as a datacenter address
- Full control — you manage the server, phone, ports, and authentication
- Low cost — VPS from 129 RUB/month + SIM card plan
- Privacy — traffic passes through your own server, not through a third-party proxy provider
Cons
- Instability — real uptime of a DIY proxy is 70–90%, not 99%+
- Manual IP rotation — airplane mode must be toggled manually or complex automation must be set up
- One carrier, one region — switching carriers requires a different SIM card
- Limited speed — depends on mobile network quality, typically 5–20 Mbps
- No technical support — you solve all problems yourself
- Scaling — each additional IP requires a separate phone and SIM card
When it is better to buy ready-made mobile proxies
For regular tasks, the DIY option quickly hits its limits: connection drops, manual rotation, and being tied to a single carrier. If you need mobile proxies for scraping, multi-accounting, or working with antidetect browsers — it is simpler and more reliable to rent a ready-made solution:
- Automatic IP rotation — change the address via a link or API without manually toggling airplane mode
- Guaranteed 99%+ uptime — 24/7 monitoring, automatic recovery on failure
- Choice of carrier and region — MTS, MegaFon, Beeline, Tele2 across different cities in Russia
- High speed — industrial modems and external antennas deliver a stable 20–50 Mbps
Frigate Proxy mobile proxies — automatic IP rotation, choice of carrier and geo, authentication by username/password and by IP. Connect in 2 minutes without manually configuring servers or phones.